Types of insulation of the facade of a private house with your own hands: photos and videos, how to properly insulate the walls from the outside
If the suburban building is spacious enough, internal insulation can be performed, but if the building is very small, it is not advisable to resort to this method, because additional cladding will “steal" the space. Therefore, it will be more practical to perform external insulation of a private house in a dry or wet way.
Country buildings are increasingly being used not just for spending the night after gardening, but as a place to relax not only in summer, but also in the cold season. Isn't it wonderful, for example, to celebrate the New Year outside the city, or to get out for the weekend to breathe in the autumn air?
How to insulate a private house with your own hands in different ways is described in detail in this article.
Why is it necessary to insulate the house?
The answer to the question of why insulate a house lies on the surface. This is necessary so that you can always hide in the building from the cold. In order to relax with complete comfort, of course, some options for warming a private house should be provided, especially if it has neither a fireplace nor a stove. Of course, you can use electric heating systems, there are a great many of them now. But it is very important that the house is not only heated, but also retains heat as best as possible. To do this, it is necessary during the repair to think over and carry out additional work on the insulation of a private house with your own hands. The main heat loss occurs through windows, doors and walls. You can also insulate the floor, this will create additional comfort.
The walls have the largest surface compared to all other parts of the building. Therefore, how to insulate the walls in a private house should be taken care of first. It is necessary to think over options for insulation at that stage of repair work, when the facade has not yet been finished. Perhaps the choice of lining will depend on which option you choose.
Why, speaking about the insulation of the walls of a private house, this article implies that the thermal insulation will be installed outside, and not inside the room? Because it is the most efficient way to reduce heat loss. Internal insulation not only reduces living space, but is also ineffective. It can be resorted to only when it is impossible to do it from the outside, i.e. if we are talking about a city apartment in a multi-storey building. The country house allows you to install external thermal insulation without much hassle. There are two types of insulation of the facade of a private house – wet and dry. They differ in the way the layers of insulation are applied and in the materials used.
The following describes how to insulate the walls in a private house from the outside in a wet way.
Technology of warming a private house in a wet way
This type of insulation of the facade of a private house from the outside is called "wet" because one of the elements of the heat-insulating structure is plaster covering the insulation layer located under it. It itself has excellent heat-saving properties, provides sound insulation and at the same time can serve as a facade cladding. Therefore, the wet type of insulation solves several problems at once. In addition, it is quite simple in terms of technology and does not require large financial costs.
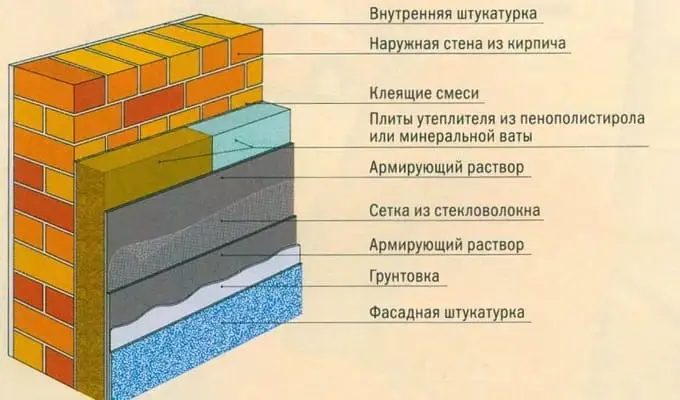
Thermal insulation in this case is a three-layer structure: an inner layer (reinforcing or adhesive), a heat-insulating layer itself and an outer protective layer made of a thin plaster mixture, which can also be a building finish.
Wet view of the insulation of the walls of a private house from the outside with your own hands can be done in two ways – using light or heavy plaster systems. A light plaster system is a method in which heat-insulating boards are attached directly to the surface of the facade wall using dowels and polymer cement glue. Most often, thin basalt slabs are used in such structures, but other materials, such as mineral wool, penoizol or expanded polystyrene, can also be used. A thin layer of plaster is applied over the heat insulator. And as a reinforcing layer for the outer coating, a polymer-cement fiberglass mesh is most often used. This method allows you to quickly, efficiently and economically insulate walls. Its only technological complexity is the need for careful leveling of the plaster layer.
A heavy plaster system is a method in which a framework of movable fasteners is used to hold a thick layer of thermally insulating plaster.
The insulation is fastened to the facade walls using reinforcing mesh and metal anchors. The advantages of this method over the first are as follows: firstly, there is no need to level the plaster layer, and secondly, the use of a reinforcing mesh prevents the insulation coating from deforming under the influence of temperature fluctuations. In addition, in this case, less stringent requirements are imposed on the density of the heat-insulating material.
The following describes in detail the stages of "wet" insulation of the facade of a private house and presents the corresponding video.
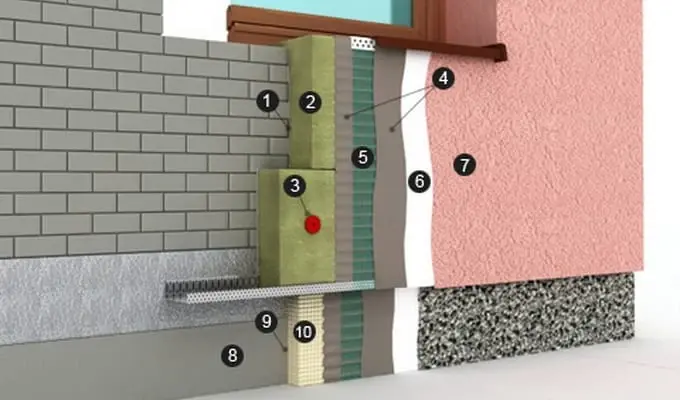
The first stage consists in fixing the insulation to the facade wall using glue or frame method. At the second stage, several layers of special plaster are applied over the insulation boards. It is made on the basis of mineral or polymer mixtures with special additives that increase the parameters of thermal insulation, water resistance, vapor permeability and wear resistance of the plaster. The final stage is the application of a waterproofing layer over the plaster, which strengthens the structure and protects it from external influences. As a waterproofing, mastics of various compositions can be used. But the most relevant at present is the use of silicate coatings based on liquid glass. Such coatings effectively provide facade protection, are easy to apply and become almost invisible when dried.
Before proceeding with the fixing of the insulation, it is necessary to prepare the surface of the walls. Preparation is primarily in their alignment. As with any kind of work, it requires as smooth a surface as possible. For this type of work, the maximum allowable unevenness is a surface drop (notch or ledge) of 1 cm.
If the wall has already been plastered and the old plaster is peeling and crumbling, it should be removed completely. If the old plaster holds firmly, there are only small cracks, then they can simply be puttied.
To insulate a private house correctly, the previously painted surface is checked for interaction with glue. To do this, glue is applied to a small area and they look to see if it has lost its properties after interacting with the paint. If the substances react, the paint must be removed.
After the surface of the wall is leveled, priming is performed. If a frameless method of fastening the insulation is used, then it is primed with the same adhesive that will be used for fastening. Glue is applied in a thin layer on the entire surface of the wall.
If the surface is porous and the glue is strongly absorbed, then after the first layer has dried, a second one is applied. In the case of the frame method of fixing the insulation (heavy plaster system), any reinforcing primer is used. It is applied with a roller or a flat wide brush.
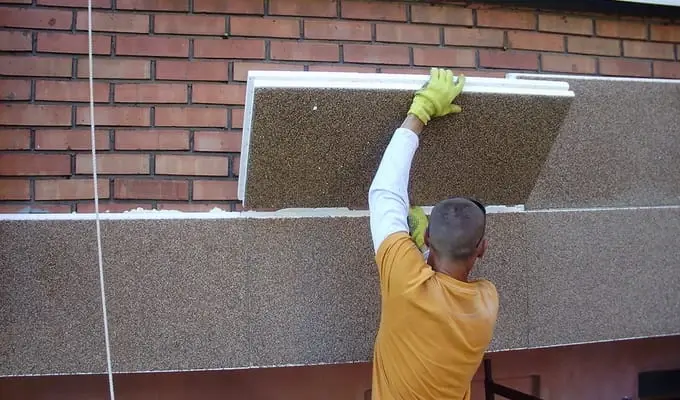
When creating a light plaster structure, before installing the insulation, a basement profile is installed in the lower part of the walls. It performs two functions – it aligns the lower boundary of the fastening of the insulation plates and serves as a support for these plates. Next, an adhesive composition is applied to the inner surface of the plates. The choice of glue depends on what material is used for insulation. It is better to consult about this in a hardware store when purchasing a heater. If the wall is very even, it is enough to apply glue only around the perimeter of the slab.
When insulating the facade of a private house, installation begins to be carried out from below, from the basement profile. Plates in horizontal rows should not be placed exactly one above the other, but with an offset, it is possible in a checkerboard pattern. Slabs lubricated with glue are pressed tightly against the surface of the wall.
If there are gaps between the joints (for example, due to the slope of the surface), they are filled with thin strips of insulation, since simply smearing with an additional layer of glue will not save the integrity of the thermal insulation.
Before proceeding with the mechanical fixing of the plates, it is necessary to wait for the adhesive to dry completely. Drying time depending on the type of glue can last up to 2-3 days. This should be specified on the packaging of the material. As a mechanical fastener for the insulation, dish-shaped dowels with a wide flat head are used.
The frequency of their location depends on the weight of the heat-insulating material – the heavier it is, the more fasteners should be. The penetration of the dowels into the facade wall is 5–6 cm for heavy concrete or solid brick and 8–9 cm for porous concrete or hollow brick.
After the installation of the insulation is completed, it is covered with a fiberglass reinforcing mesh. The mesh is fixed with a construction stapler with an overlap, the overlap is at least 5 cm. A layer of plaster is applied over the reinforcing mesh. After the plaster has completely dried, a protective coating is applied to it.
A heavy plaster system is mounted in the same way, with the only difference that the plates are not attached to glue and dowels, but to a metal profile frame.
The reinforcing mesh can be strengthened in another way – on the solution. The surface is covered with a thin layer of cement mortar or plaster, a mesh is applied on top and pressed a little. After the solution dries, a reliable reinforcing layer is formed.
Watch a video about warming a private house with your own hands in a wet way, which tells in detail about all the stages of work:
The following is a dry method of warming a private house.
Variant of dry external insulation of a private house
With a dry version of wall insulation in a private house, do-it-yourself ready-made panels of heat-insulating material are used.
These can be sandwich panels, expanded polystyrene boards, polystyrene boards, fiberboard boards, mineral wool sheets, etc. The choice of materials is very diverse, the range is increasing every year. At the moment, polystyrene foam, fibrolite and mineral slabs are considered the most effective heaters. The latter are the best choice for a budget option for thermal insulation – at a low price, this material has all the necessary characteristics of a heat insulator, and besides, it is easy to install.
One of the ways to dry-insulate the walls of a private house from the outside is a three-layer system, or the so-called well masonry. The principle of this type of thermal insulation is that the insulation is placed between two layers – outer and inner. The wall of the building itself acts as the inner layer. The outer is a layer of facing material. As a rule, in such a construction, brick is used for cladding. Thus, a heater is attached to the wall with the help of mechanical fasteners or a frame made of a metal profile. And then, over the entire area, the wall is lined with bricks (the thickness of the masonry is usually one brick).
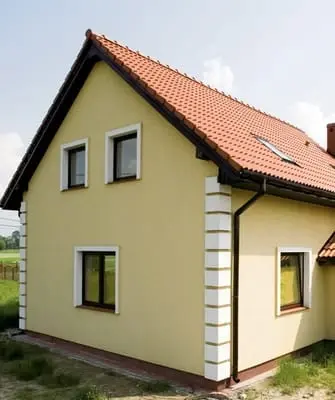
See how insulated private houses look in these photos:
The most important point in such thermal insulation is the correct determination of the thickness of the insulation layer. To do this, they operate with such a concept as the dew point. The dew point is the point at which moisture-saturated steam coming out through the wall from inside the room condenses into water. Condensation forms when the air cools to a certain temperature and loses its moisture capacity. If the insulation layer is thick enough, then the cooling of the air leaving the house will occur somewhere in the area of u200bu200bthe cladding and the resulting condensate will not damage the wall. If the layer is too thin, then the air cools (respectively, moisture condenses) close to the inner wall, which eventually leads to dampness, mold or fungus damage.
The second option for dry insulation of a private house from the outside with your own hands is a ventilated structure. This is practically the same as well masonry, with the only difference being that there is also a fourth layer – air. The air layer is created either between the facade wall and the insulation, or between the insulation and the cladding. In both cases, the air circulating freely inside the structure does not allow moisture to stagnate, carrying it outward with an upward flow. This design allows you not to waste time calculating the dew point.
To insulate the facade of a private house and create a layer between the wall and the insulation, a crate is placed on the wall or a frame is attached, and a layer of insulation is laid on top of them. Due to this, an air gap is formed, equal to the thickness of the crate. In the second option (a layer between the insulation and the cladding), the insulation itself is attached to the wall, and the cladding is mounted on the frame. In this case, sheet materials or siding are used as cladding.
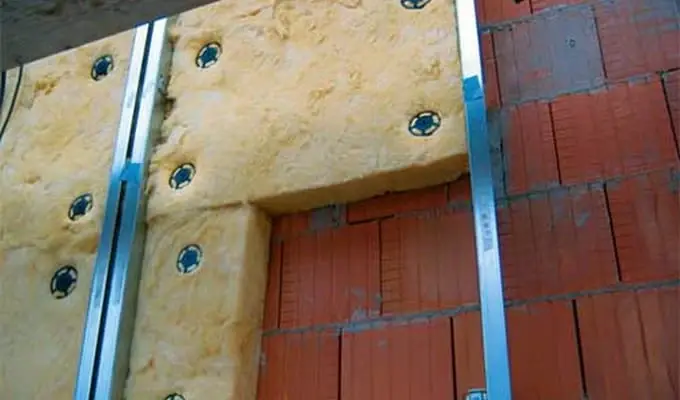
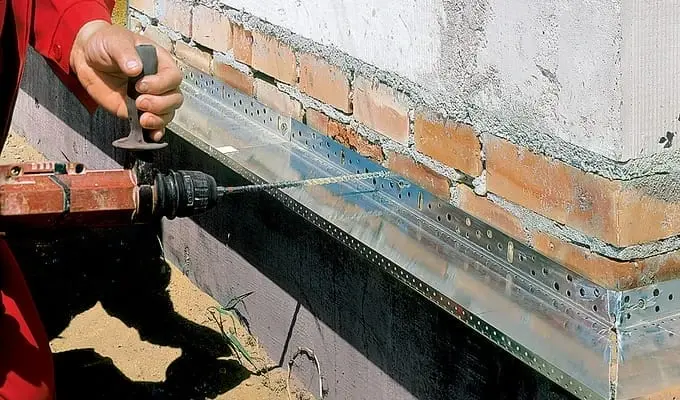
The technology of dry ventilated insulation of a private house is considered on the example of creating a structure with a layer between the wall and the insulation. The first stage, as always, is preparatory – just like with the wet method, it is necessary to clean, level and strengthen the surface of the facade wall with a primer. At the second stage, a crate is created. It can be made from wooden bars with a section of 40 x 60 mm or from a galvanized metal profile. When using timber, it is important to ensure that the wood is properly dried. It is also desirable to cover the bars with antiseptic impregnation.
The step of the crate depends on the width of the heat-insulating material. The wall is marked with vertical lines. The distance between them is equal to the width of the insulation sheet. The slats of the crate are fixed so that the marking line runs along their center. Then the sheets can be attached to them end-to-end, without gaps.
The next step is to attach the insulation to the crate. This is done using self-tapping screws, which are screwed along the perimeter of the sheet close to the edges so that they enter the laths of the crate. A waterproofing film is attached over the insulation. It prevents moisture from entering the insulation through the outer facing layer. The final step is the installation of the cladding.
This video talks about how to insulate a private house in a dry way: