Turning ice cream sticks into decor
Ice cream sticks are considered safe raw materials for creativity. But given that small children who have a habit of putting toys in their mouths will come into contact with them, it is worth carrying out a disinfection procedure. To do this, the sticks are boiled in water for half an hour. As a result of boiling, a double effect is achieved:
- the surface is cleaned of microbes;
- sticks acquire the property of flexibility.
The property of flexibility and resistance to deformations can be given by soaking the "holders" in warm water for 12 hours. But the boiling procedure quickly endows the sticks with the necessary qualities. The working material must be thoroughly dried and the creative process can begin.
simple crafts
Simple crafts made from ice cream sticks will be great fun at home on vacation and in summer groups. They are easy to design, glue is enough to connect the sticks. The pleasant emotions that such creativity will bring will be preserved in crafts and will become a wonderful memory of the summer.
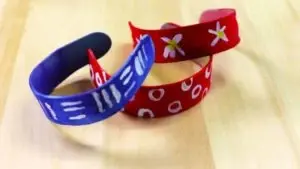
Bracelet
For the easiest and fastest way to make an ice cream stick bracelet, you will need:
- Sticks (for one bracelet 2 pieces);
- Super glue;
- Decor elements (ribbons, lace);
- Scissors;
- Pot with water, empty glass.
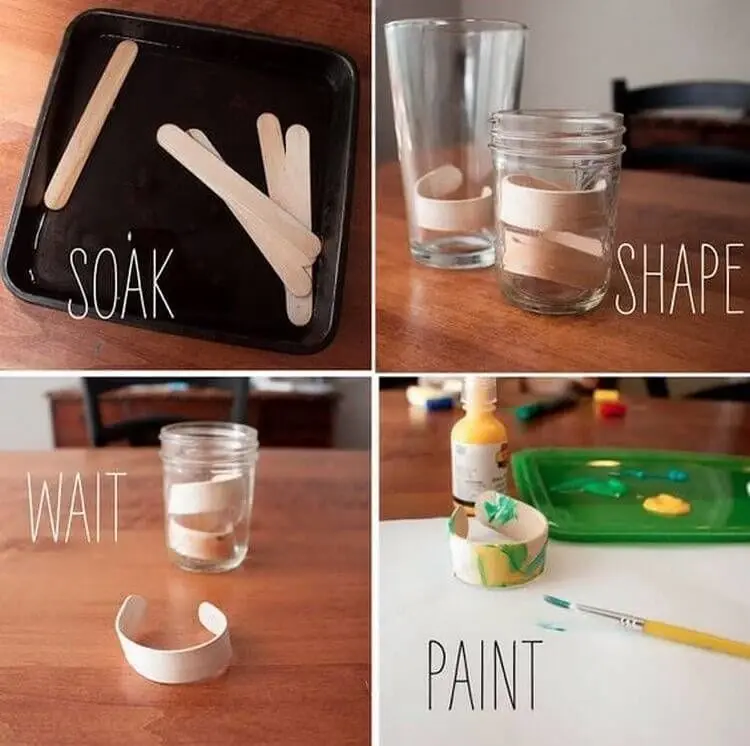
The bracelet is made as follows:
- At the first stage, the workpiece is soaked in water. You can soak overnight in water, you can boil for forty minutes.
- With the help of a glass, the wet stick is slowly bent until it takes the shape of a semicircle, and then placed inside the glass until completely dry.
- Both parts are tried on by hand, the appropriate diameter is adjusted and the two halves are glued together. The resulting product can be wrapped with a satin ribbon or decorated in any other way.
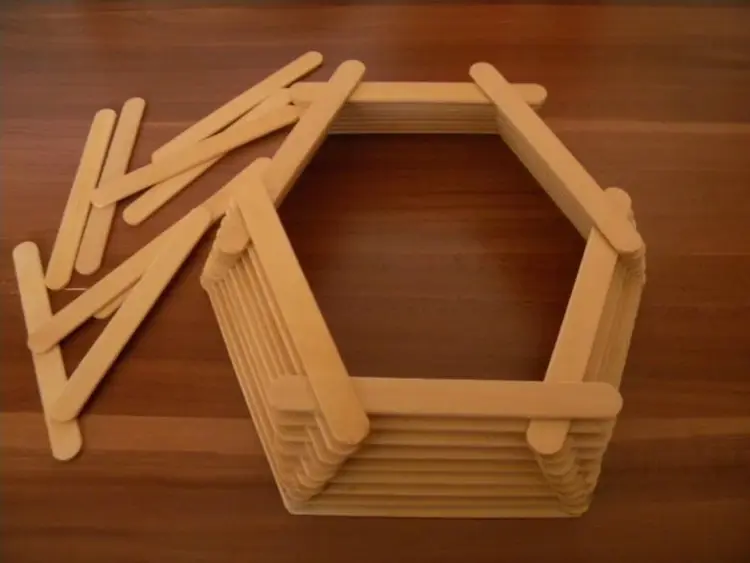
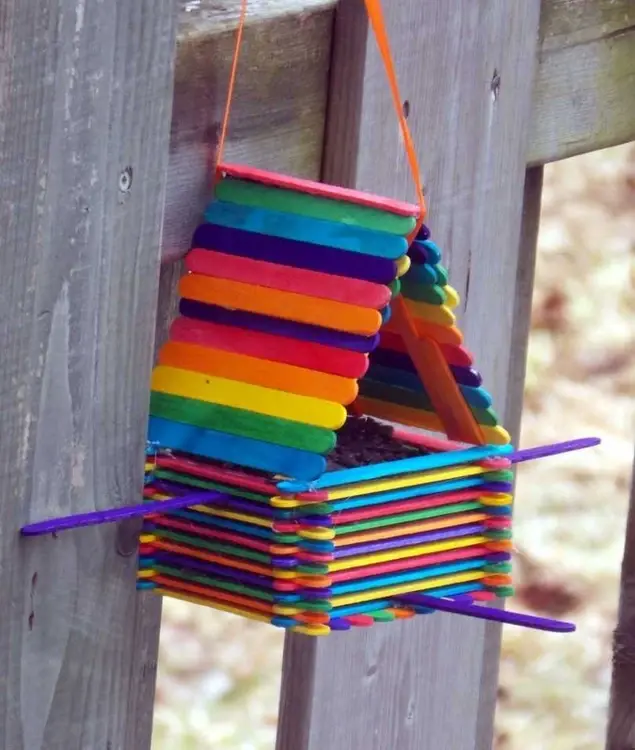
Bird feeders
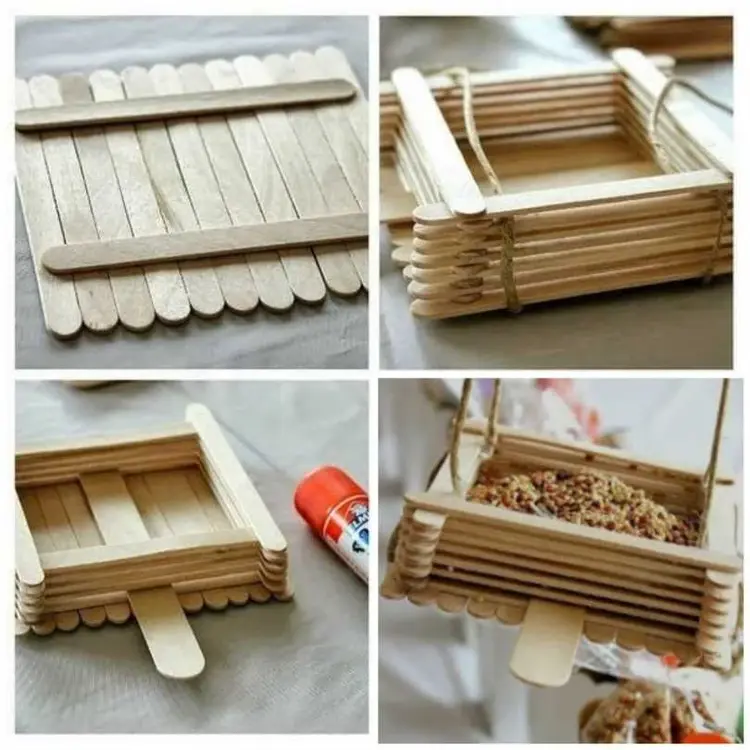
A wonderful option to spend a family day with benefits for the environment. It might be a great idea to work together on a winter day on a bird feeder. It is done quite simply, but your baby will have the opportunity to develop a sense of empathy and care for animals in a game format.
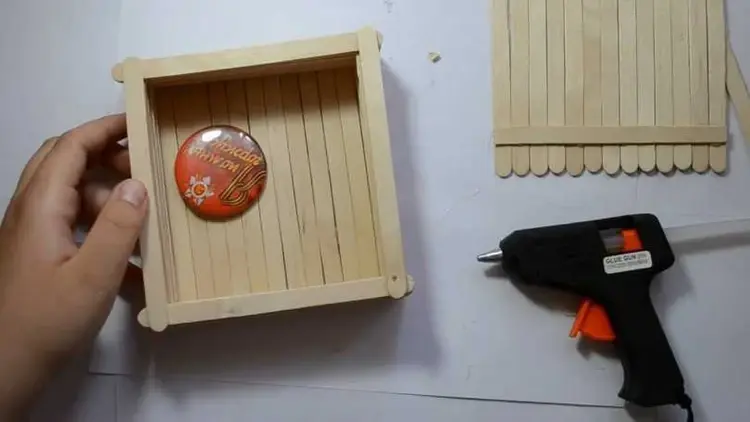
To assemble a simple box where you can pour seeds, you can use the example with a box. Alternately cross and glue the sticks. The child can color it to their liking. We cling to the rope and solemnly hang it in the nearest park!
Camper
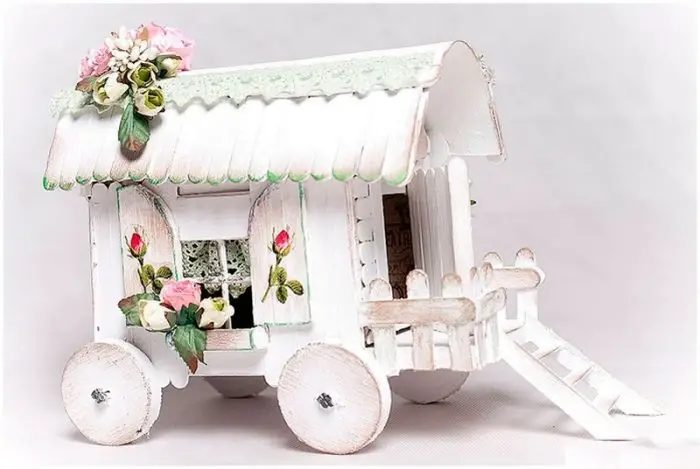
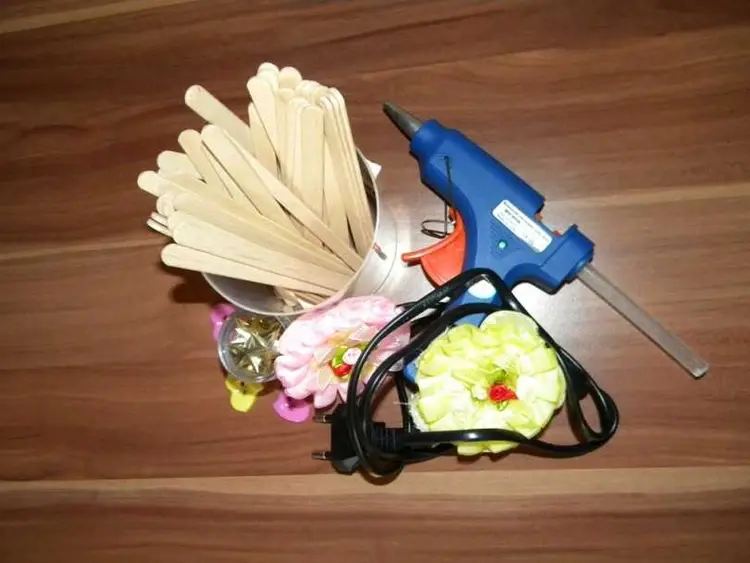
You will need: ice cream sticks, wooden skewers, 4 mm thick cardboard or plywood, glue gun, furniture hinges, white paint, stationery knife, ruler, scissors, pencil, compass, wallpaper, stick napkin, decoration elements – lace, flowers, satin ribbon…
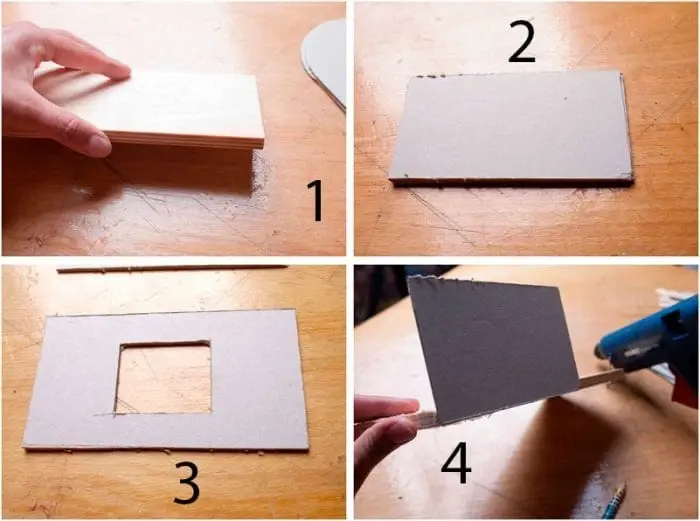
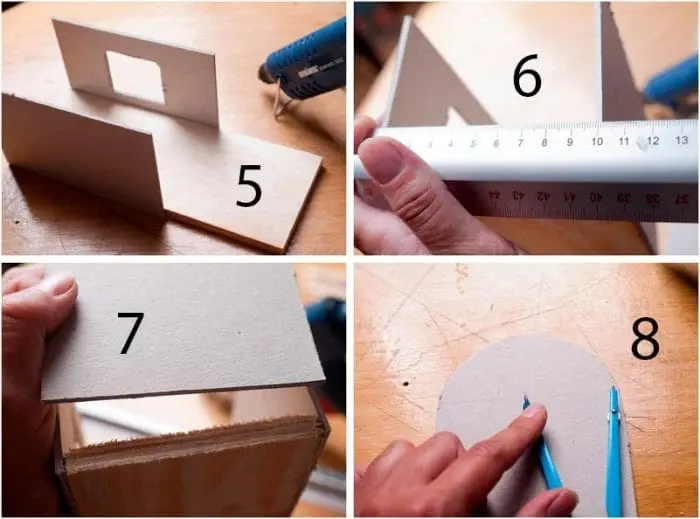
- Cut out a 24 x 9.3 cm rectangle from cardboard or plywood. This will be the base of the house.
![Turning ice cream sticks into decor]()
- Cut out 2 rectangles of 15×8.5 cm from cardboard. It is worth noting that the height of these rectangles should be equal to the length of the sticks.
- Cut out a box in the center of one of the rectangles.
![Turning ice cream sticks into decor]()
- Glue the rectangles to the base to form the walls of the house, then measure the width between them.
- Cut out a rectangle equal to the width between the walls, 8.5 cm high.
![Turning ice cream sticks into decor]()
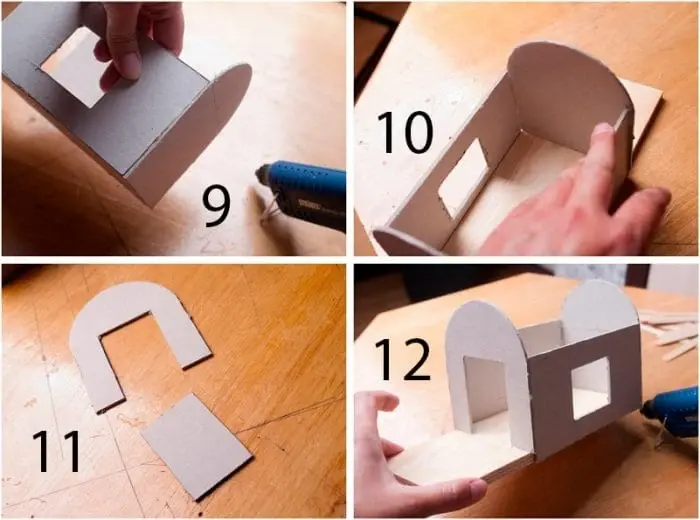
- Round the top of the rectangle as shown in the image and make the second blank in the same way.
- Glue the first blank between the walls.
- Make a door hole in the second blank, then glue.
![Turning ice cream sticks into decor]()
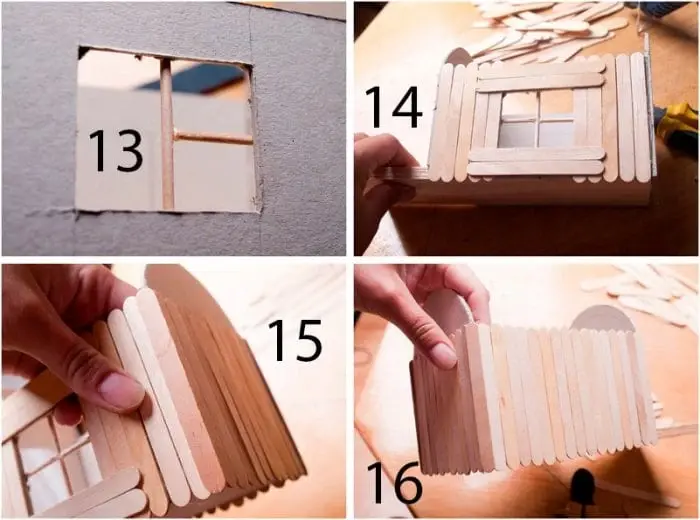
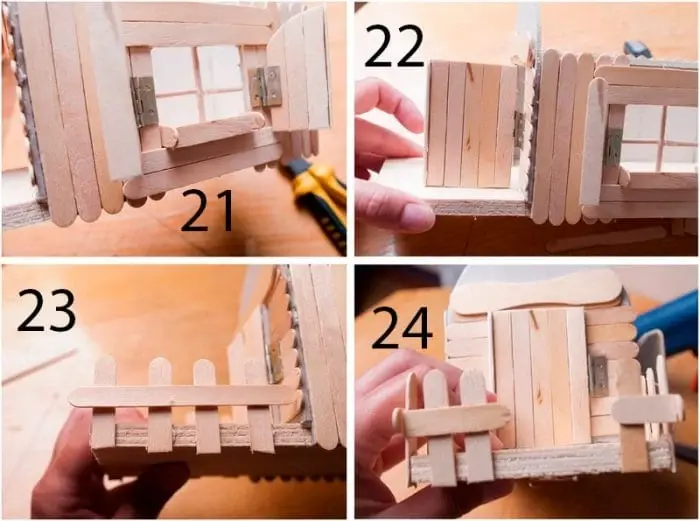
- Make a frame for the window by gluing the skewers crosswise.
- Glue the house with popsicle sticks.
![Turning ice cream sticks into decor]()
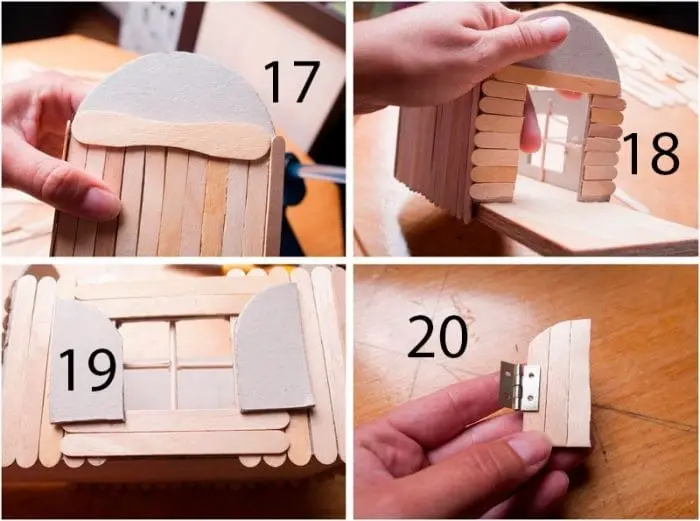
- Cut a rectangle out of cardboard the same size as the window.
- Cut it in half and cut off the upper corners in a semicircle to make shutters.
- Paste the shutters with sticks, glue the furniture hinges, then attach to the window.
![Turning ice cream sticks into decor]()
- Form a window sill from sticks, then glue it.
- Tape the door with sticks, glue the furniture hinge, then attach it.
- Glue the sticks to the base of the house as a fence.
![Turning ice cream sticks into decor]()
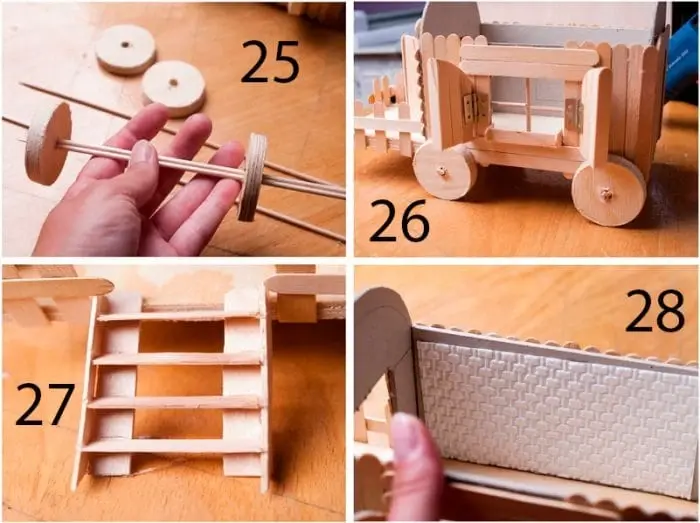
- Cut out 4 wheels from plywood or cardboard, then glue 2 wheels on opposite sides onto 2 skewers.
- Glue skewers with wheels under the base of the house.
- Make a ladder out of sticks and glue it on.
- Cover the inside of the house with wallpaper.
![Turning ice cream sticks into decor]()
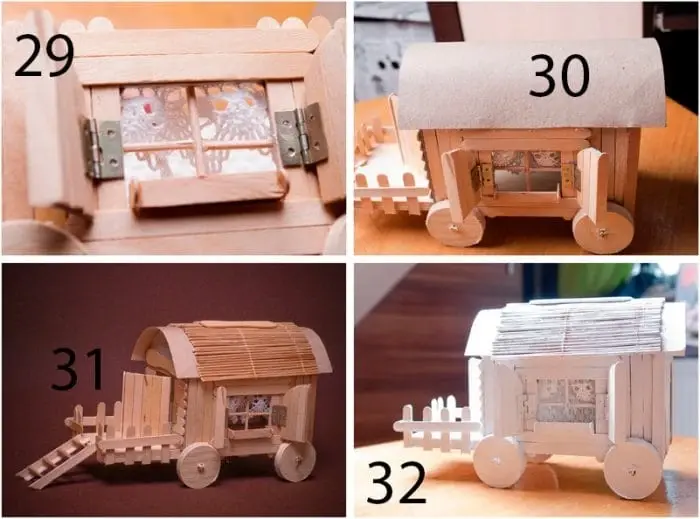
- Glue on lace for curtains.
- Cut out the cardboard and glue it in place of the roof.
- Glue a doily of sticks to the roof.
![Turning ice cream sticks into decor]()
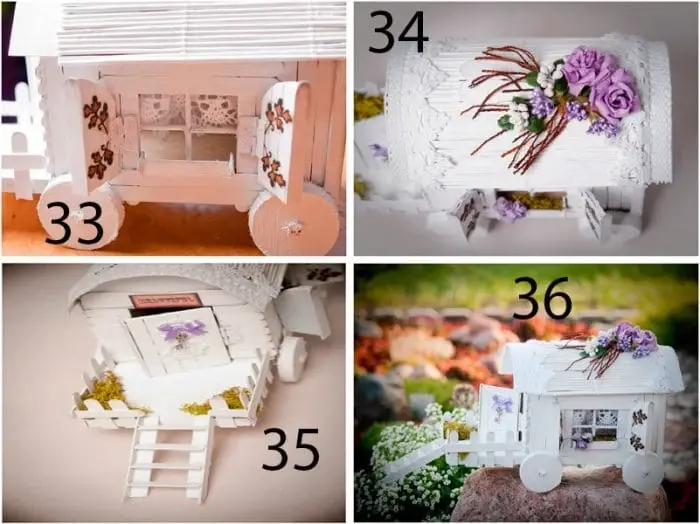
- Paint the house with white paint and wait for it to dry.
- Decorate your home to your taste with flowers, ribbon and lace.
See also: beautiful handmade hair clips
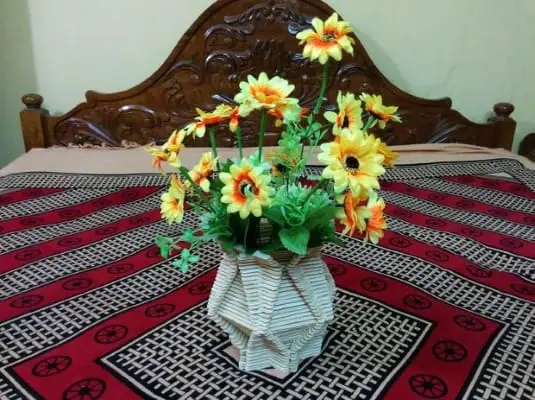
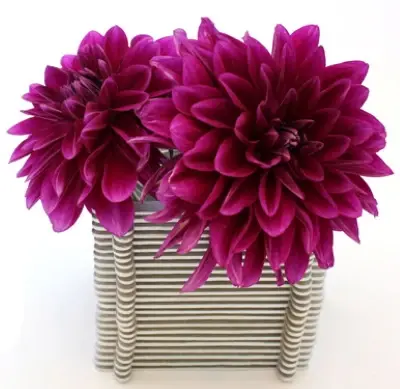
Vases
To make them, sticks must be soaked in water. They should be flexible and easy to take the desired shape.
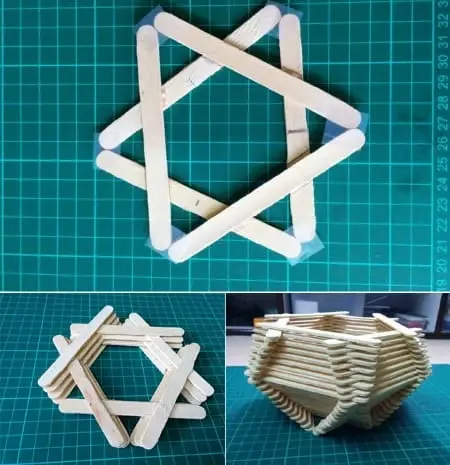
The work steps are as follows:
- For a future vase, take a glass container.
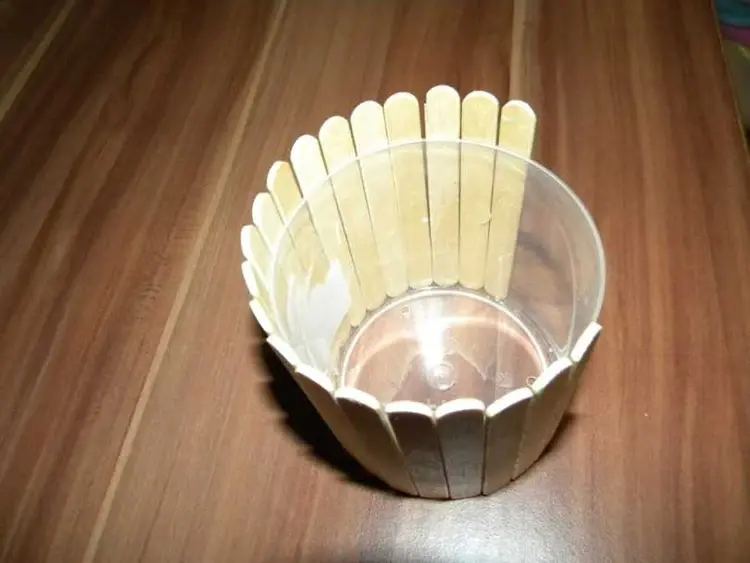
- Using tweezers, insert each stick into the container so that, after drying, they take on the shape of its walls.
- After the parts have become solid, take them out and assemble them again. This will be a vase made of wood.
- Paint and decorate the vase with decor or paper using the Decoupage technique.
So that the product does not crumble, it is better to mount the sticks on a similarly shaped base or vase, but outside.
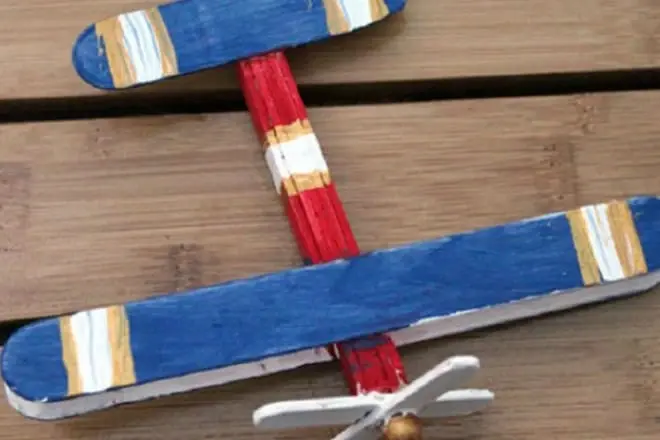
Airplane
The plane will be an interesting craft for the holiday of February 23 or May 9. Such an aircraft can even fly, but for short distances. To construct it, you will need several parts from a sweet, a cocktail tube, a screw, glue and scissors.
How to work step by step:
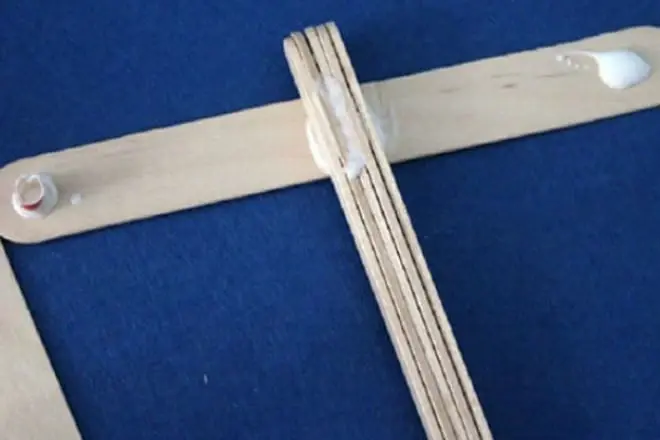
- Glue several parts together and attach perpendicular to one. This will be the body and wings.
![Turning ice cream sticks into decor]()
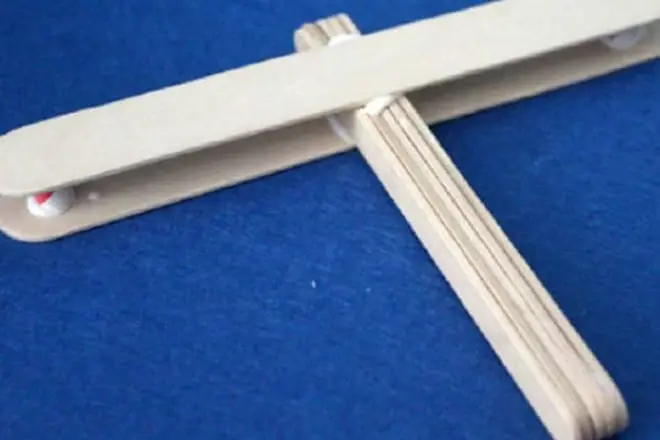
- Cut off pieces of 1 cm from the tube and glue to the ends of the wings. Glue another piece of ice cream on top.
![Turning ice cream sticks into decor]()
![Turning ice cream sticks into decor]()
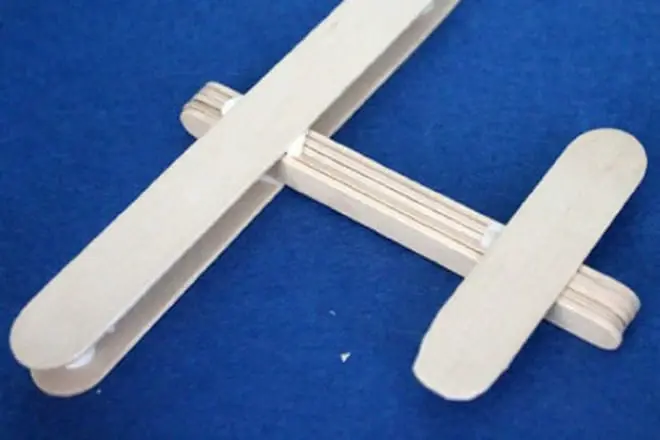
- Shorten one stick so that you get a small detail. Attach it to the body near the tail.
![Turning ice cream sticks into decor]()
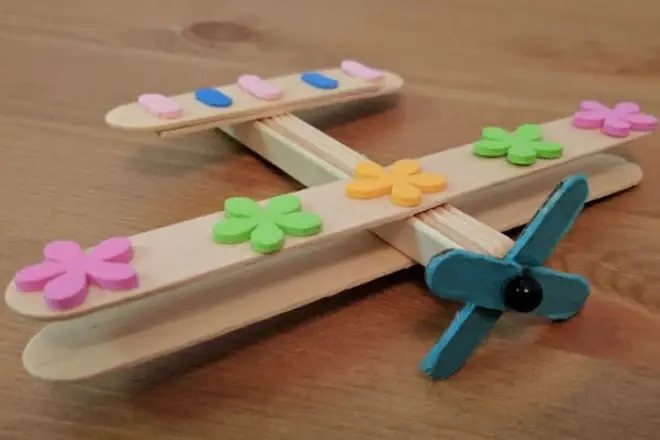
- Cut one wooden piece in half, reproach. Fold the blanks with a cross. Using a self-tapping screw, screw to the nose of the aircraft. This will be the propeller that spins.
![Turning ice cream sticks into decor]()
- It remains only to decorate the toy.
![Turning ice cream sticks into decor]()

Puzzle
There are several options for making a puzzle, for the simplest you will need:
- Sticks (the number varies depending on the size of the pattern);
- Paints and felt-tip pens / picture or photograph – no longer than sticks;
- PVA glue;
- Scotch;
- Stationery knife;
- Colorless varnish.
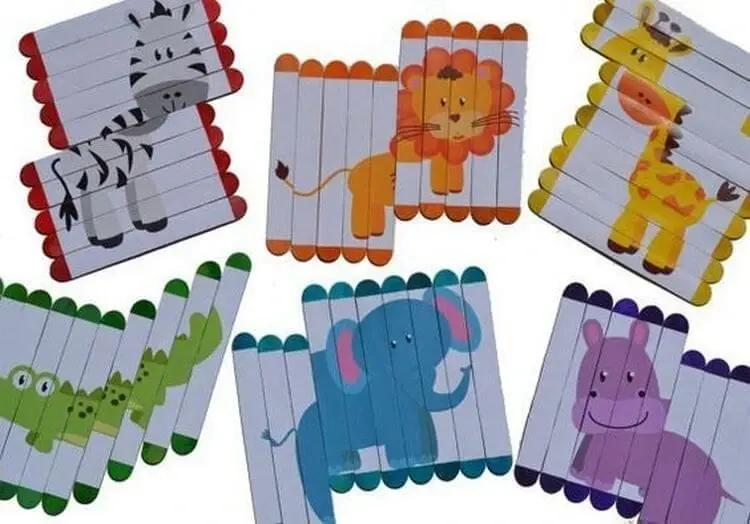
Step-by-step instruction:
- The bars are laid out tightly to each other and fixed with tape.
- The desired pattern is applied to the reverse side with paints and felt-tip pens. When the drawing dries, it is varnished, and the tape on the back is removed.
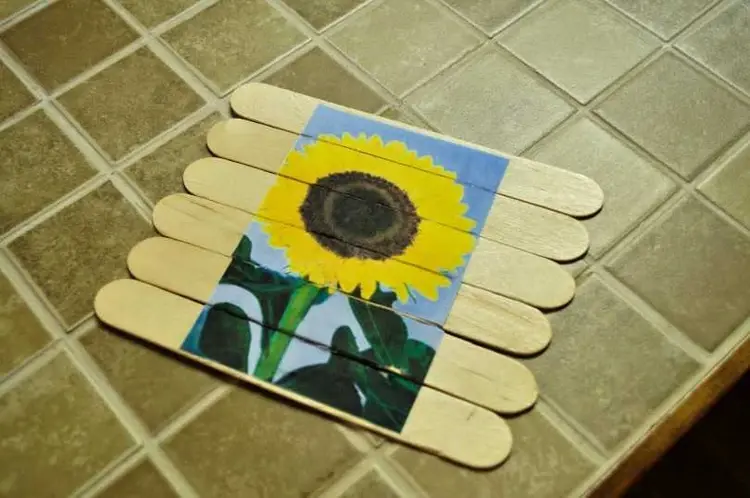
- Instead of a drawn picture, you can use a photo. To do this, repeat step 1, and then grease the surface of the pictures with PVA glue. After drying, the picture is cut along the lines, the adhesive tape is removed from the back. The protruding edges of a photo can be cropped.
Christmas tree made from ice cream sticks
What a holiday without a traditional Christmas tree, under which Santa Claus will put long-awaited gifts. The image of this coniferous tree will be appropriate in the apartment, as a Christmas decoration, a gift for relatives.
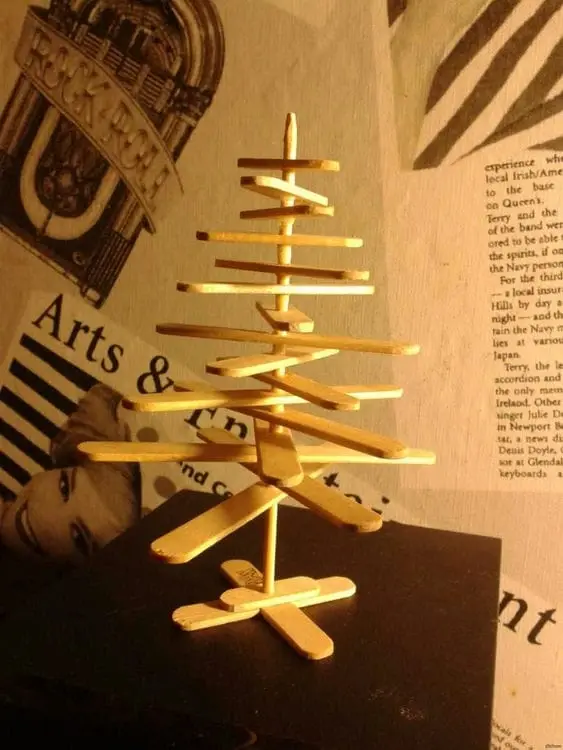
Perhaps this is an interesting way to maintain a warm mood and honor the holiday. The easiest way to depict a Christmas tree is to fasten three pieces in the form of a triangle and stick a red star and colored paper on top.
Bench
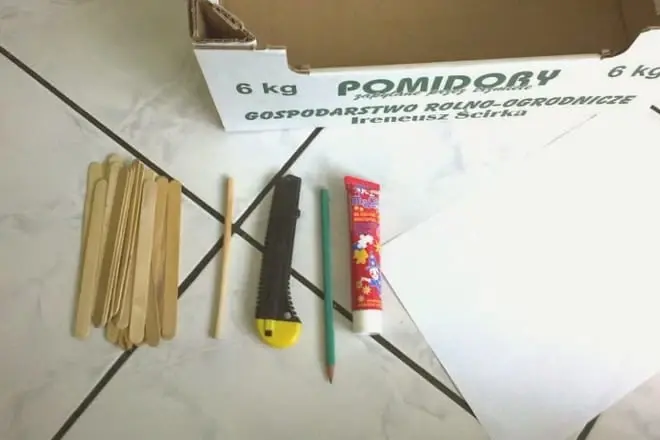
The bench will be another creative craft. To create garden, doll furniture you will need:
- Cardboard;
- Design paper;
- Detail templates;
- Wooden ice cream holders;
- Glue, pencil, scissors;
- Paints.
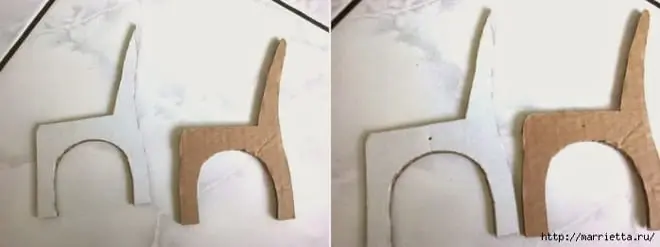
The order of work in stages:
- Cut out the side pieces of the bench according to the template. Cover with paper. In the middle, make cuts in the shape of the base.
![Turning ice cream sticks into decor]()
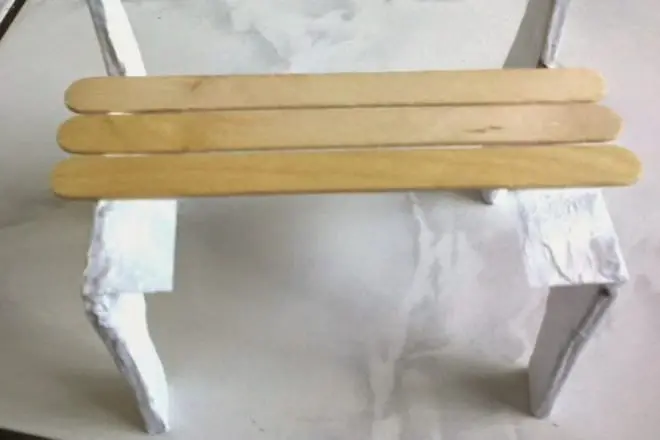
- Connect the two sides with a wooden piece. Glue other parts of the seat on top.
![Turning ice cream sticks into decor]()
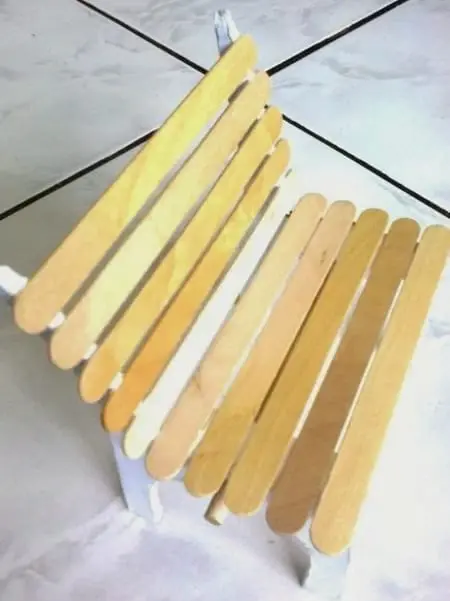
- Arrange the back in the same way.
![Turning ice cream sticks into decor]()
- It remains only to creatively decorate the bench and seat the dolls there.
![Turning ice cream sticks into decor]()
![Turning ice cream sticks into decor]()

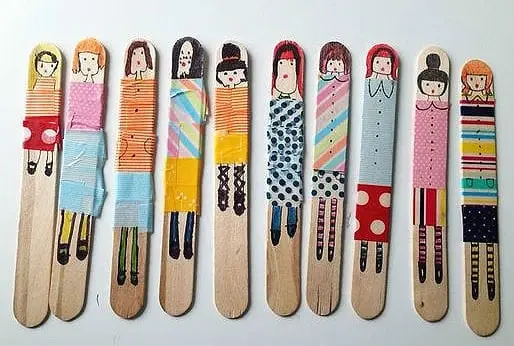
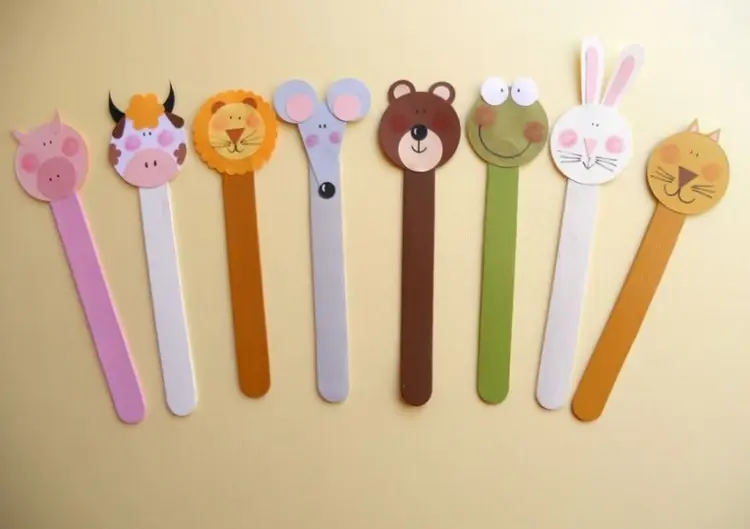
Puppet Theatre
Imagine that in your hands are not ordinary wooden sticks, but blanks for dolls with which you can play theater and other games. Paint the sticks as you wish: perhaps they will be people, animals or characters from your favorite cartoon. With this set, you can play with friends, taking it outside.
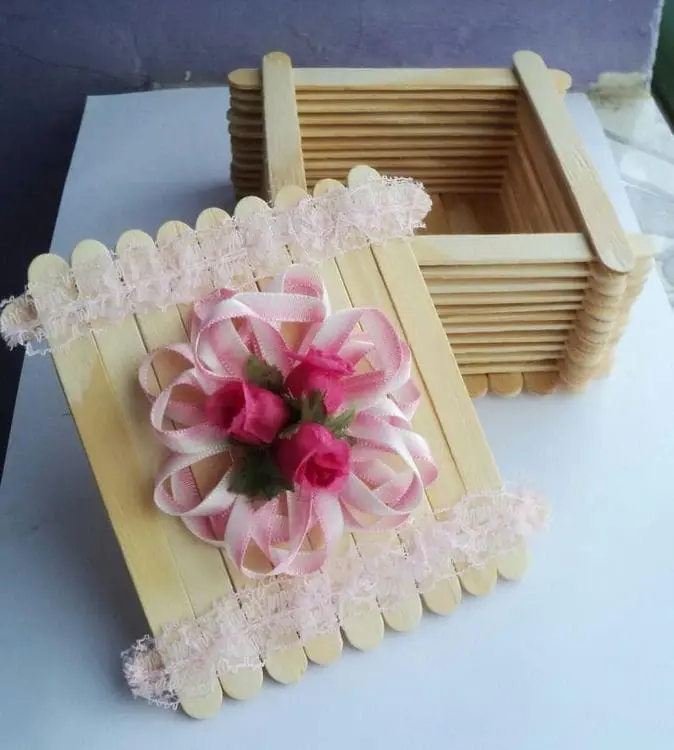
casket
Organizers and various boxes decorated with wooden elements look incredibly beautiful. To get a container useful for storing small things, you need to glue the planks in turn and gradually bring them to the desired shape and volume.
To assemble a full-fledged box, first prepare the blanks. Decorate with wood patterns, then paint or glue on other bright accents.
The easiest way is to paste over a ready-made plastic or paper cup. An iron can will do as well. The final version can be painted or varnished.
So you give your creation a long life.
In order for a semicircular hinged lid to come out for a small chest, you need to stick pieces of wood with small gaps between them on a cardboard figure. So they can move slightly in relation to each other, and the design will become more flexible.
Boxes are well used for pencils, beads, hair clips, paper clips, threads, etc.
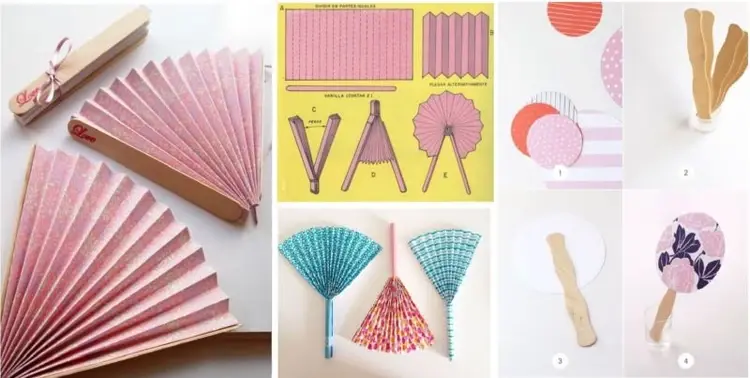
Fan
Another way: to make an exquisite fan, which can be used both to decorate the walls in the interior and to use it in hot weather. For a useful accessory you will need:
- Sticks (5-8 pieces)
- Sheet of paper (fabric)
- Scissors
- Glue
- thin wire
- Items for additional decor (ribbons, paints, etc.).
It is made in just a few simple steps:
- A small hole of the same diameter is made in the lower part of each, through which a wire will be passed, fastening the frame and ensuring its mobility.
- The wire is threaded and fixed, it should not be tightened too much so as not to prevent the folding of the fan. Its sharp edges are removed.
- An open fan is applied to a sheet of paper (or fabric) and circled in a semicircle (this is the very canvas of the fan).
- The part is cut out, decorated as desired and glued to the base of the fan. Then you need to carefully fold the structure with an accordion and open it again.
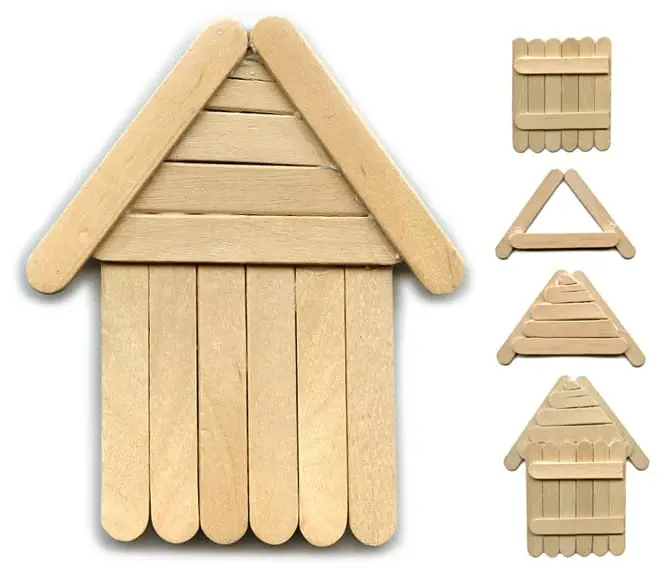
small house
The house will be a more complex version of the craft. This will require a lot of popsicle sticks, scissors, wood glue, a pencil and decoration materials.
The order of work in stages:
- Make 4 identical squares from sticks, glue them together. These will be the walls of the log house. Also make the slopes and the base of the roof. This will require 3 of the same squares.
- Seal all squares tightly with chopsticks.
- From other sticks make two triangles and fix them. Glue the triangles to the base. Then fix the roof slopes on them. Glue sticks into the small ends of the roof, gradually reducing each detail.
- On the walls with a knife along the ruler, cut out the windows and the door. Glue the walls together.
- Fix the roof on the walls.
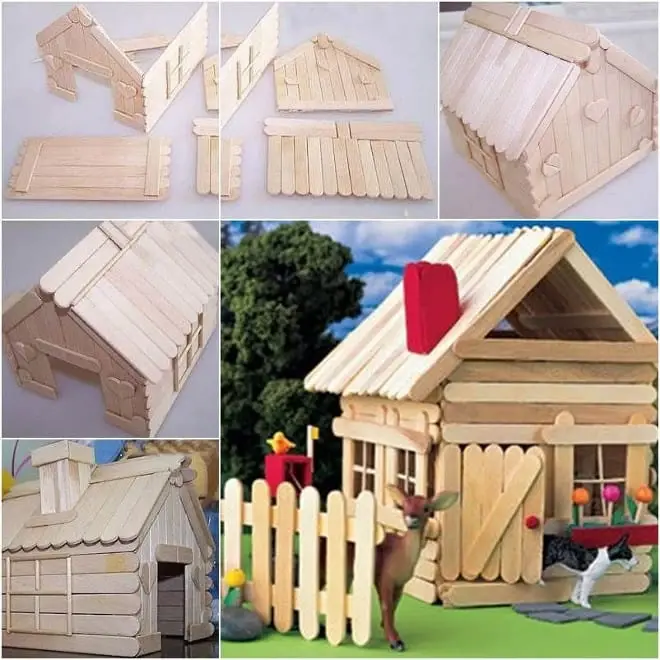
The house is ready, it remains only to decorate it. Half the house can not be glued, then any toy can be placed in it.
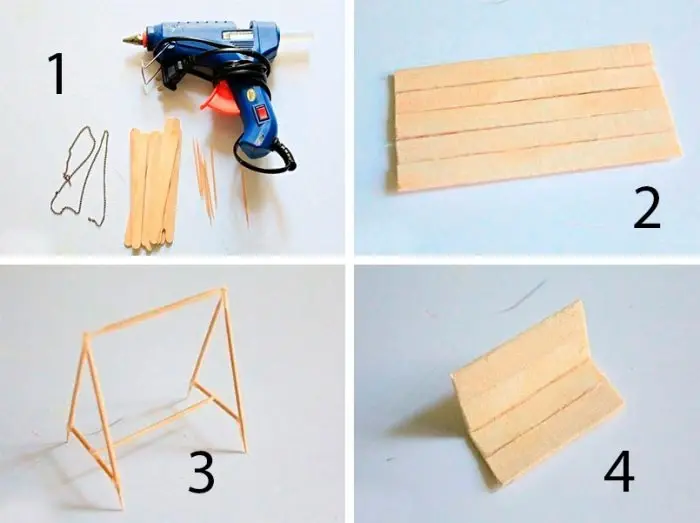
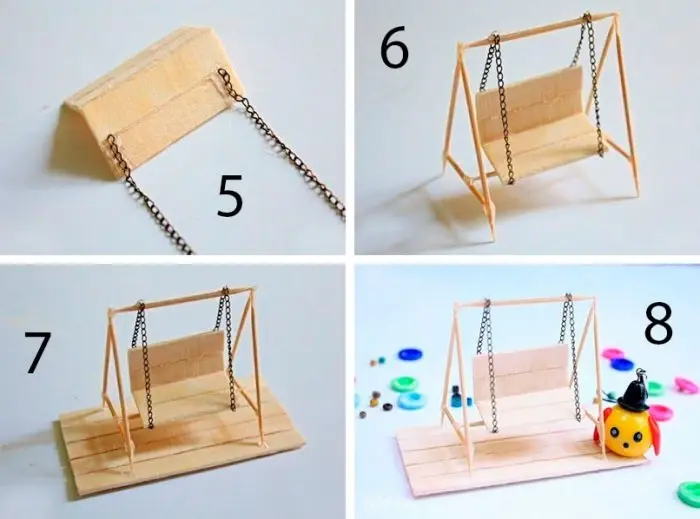
little swing
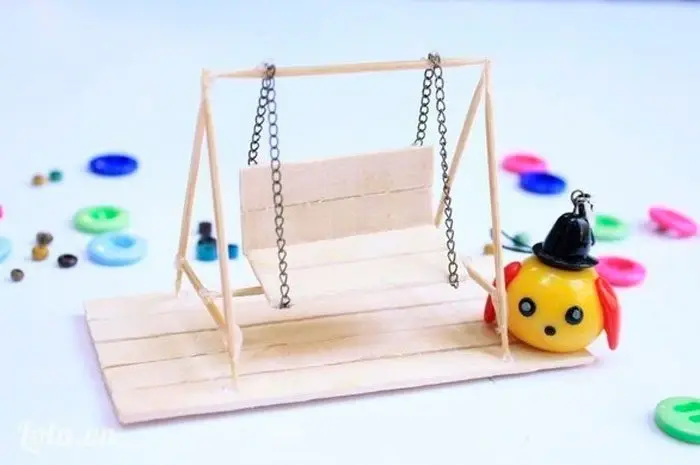
You will need: ice cream sticks, toothpicks, chain, scissors, glue gun.
- Prepare 4 ice cream sticks and cut off their roundness.
- Glue 2 sticks together.
![Turning ice cream sticks into decor]()
- Glue 2 blanks together at an angle of 100 degrees.
- Glue the chain.
![Turning ice cream sticks into decor]()
- Assemble and glue the construction of 8 toothpicks as shown in the image.
- Glue the swing to the structure.
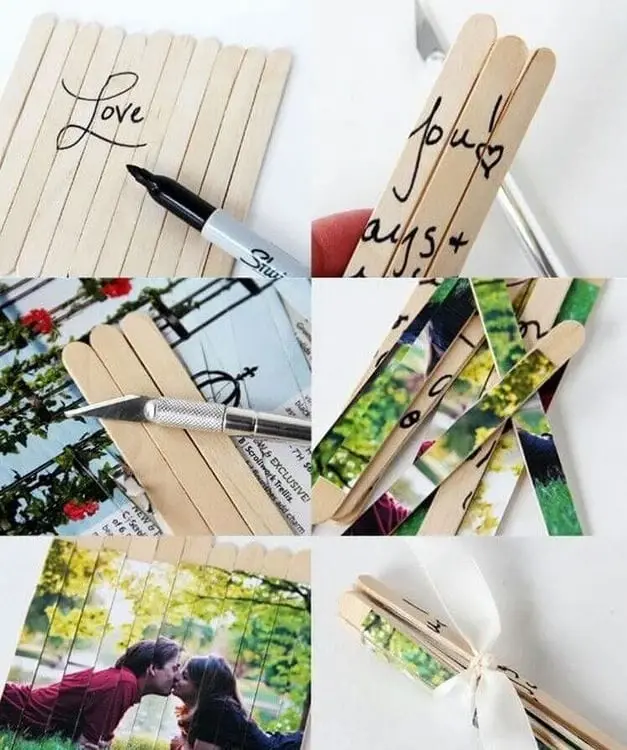
Tab for books
A bookmark for books is one of the most practical and simple crafts. For the simplest, you need to prepare:
- Ice cream sticks (depending on the number of bookmarks).
- Paints;
- Decorative elements (cardboard sheets, ribbons, etc.);
- Scissors and glue
The outline of the desired pattern is outlined on the cardboard, which will be glued to the bookmark. This drawing is cut out of paper twice. The ice cream stick is then dyed in the desired color. After the paint dries, a cardboard part is glued to the top of the future bookmark on both sides.
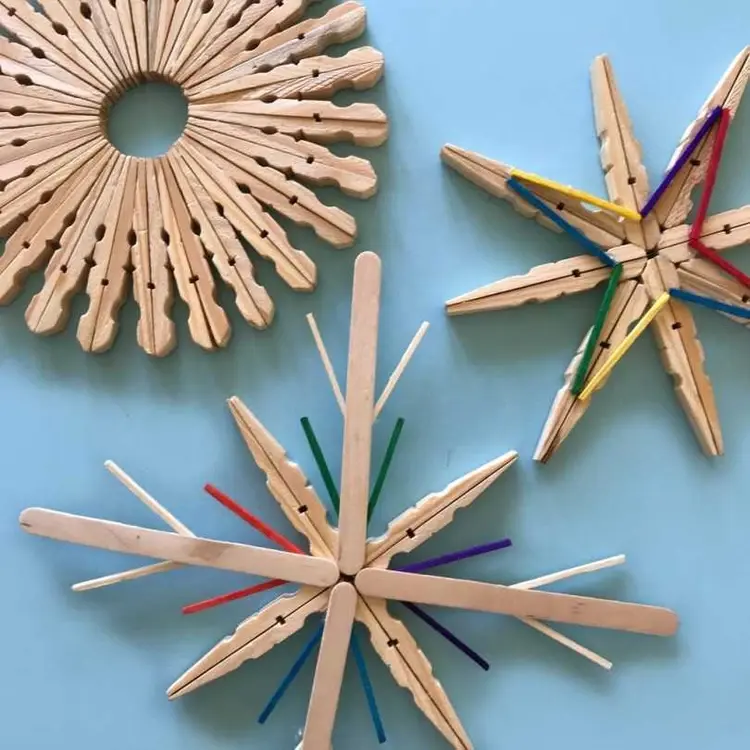
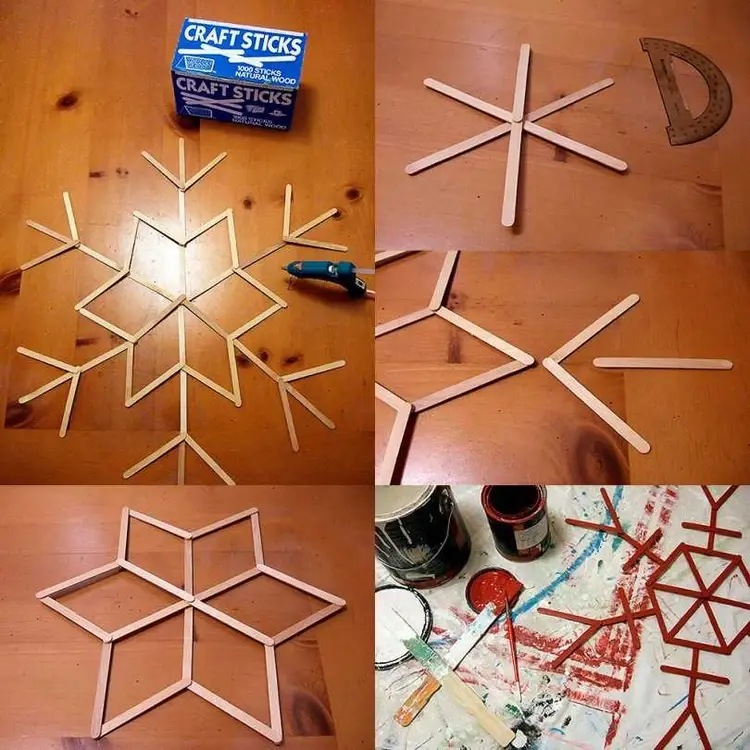
Star
Traditionally, during the winter holidays, everyone tries to decorate their homes and workplaces with stars or snowflakes. Paper garlands are gradually becoming obsolete. I want something unusual, preferably reusable. An excellent way out will be themed crafts made of wooden sticks.
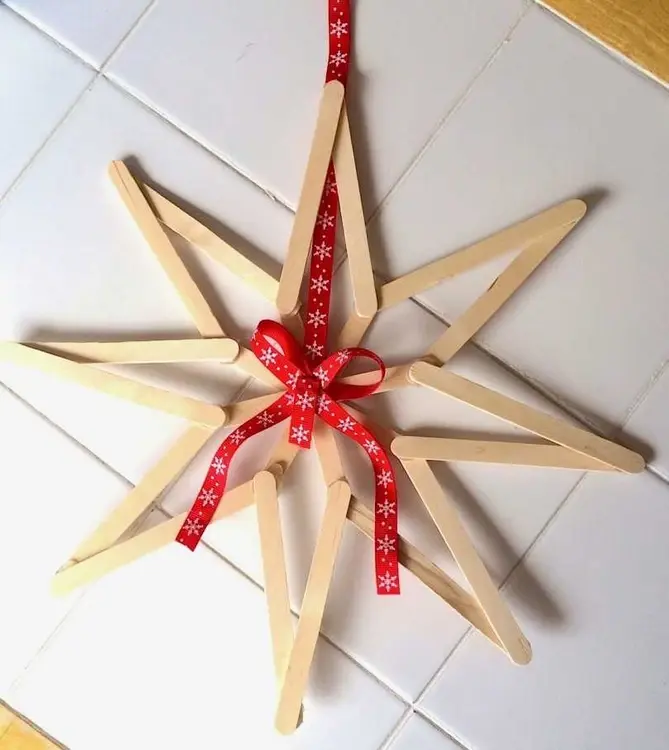
The most convenient way would be if you first draw a diagram of the future crafts, and then glue all the pegs in the right way. When it comes to decorating, let your imagination run wild:
- can be painted;
- sprinkle with sparkles;
- paste over broken Christmas toys;
- wrap with snow;
- attach an electric garland;
- simply decorate with colorful accessories.
The resulting decoration can be hung on the window, or at work, taken to school or kindergarten, and even hung on the front door, instead of a banal coniferous wreath.
Stand for hot
To make a stand, you need to stock up on the following items:
- Sticks (50 pieces);
- Wooden beads (large and small diameter);
- Three identical long elastic bands;
- Drill.
Step-by-step instruction:
- With the help of a drill, three holes are made in each piece of wood: two from each edge and one in the center.
- An elastic band is threaded through the upper holes of 25 sticks, "bars" and large beads alternate.
- Similarly, you need to do with the central row, but this time smaller beads are used.
- An elastic band is threaded through the third row.
- When the semicircle is ready, you need to tie a knot and leave the tail.
- Repeat the same pattern with the second half.
- Link the parts to each other.
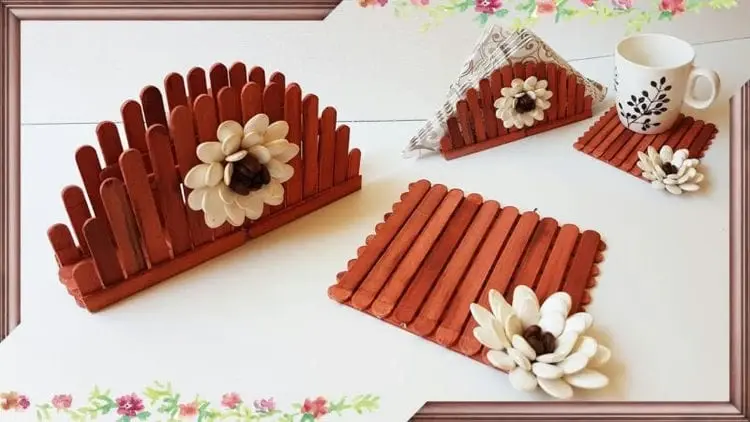
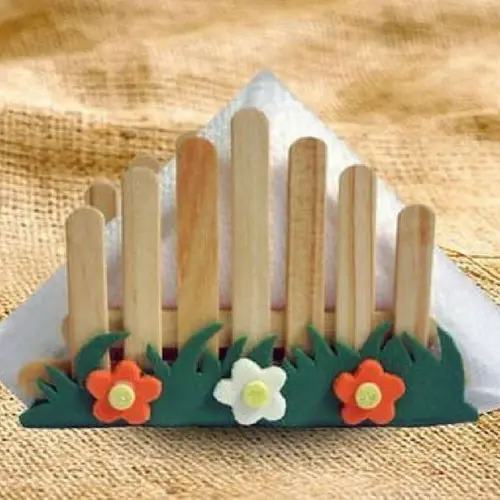
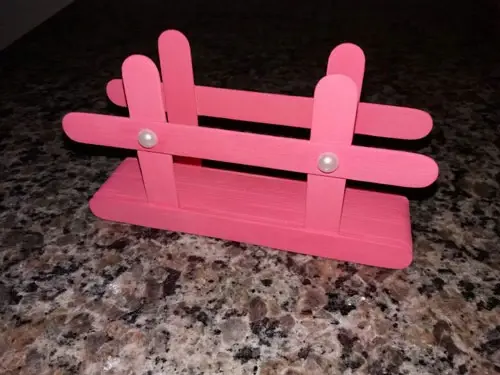
napkin holder
This is the simplest version of the napkin holder.
- Two sticks are cut in half. Between two whole sticks (closer to the edges), glue the halves rounded up. These will be the holders.
- Several sticks (from 6 to 8 pieces) are tightly glued together to make a bar.
- This bar is inserted and glued between the "holders" parts.
- Paint and decorate the entire structure.
There are a few other options for napkin holders.
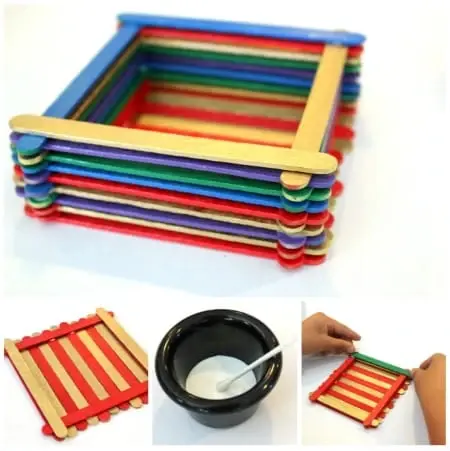
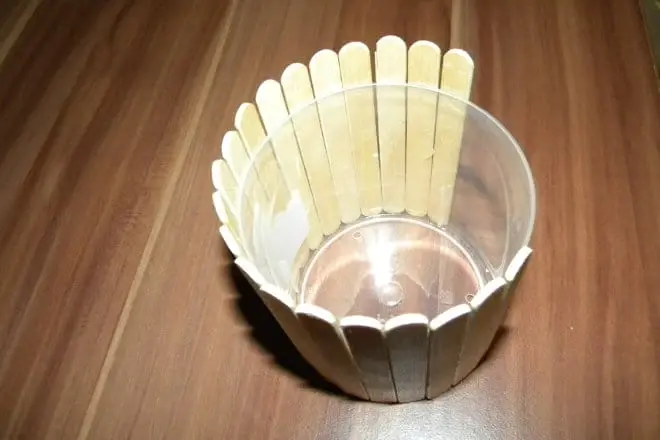
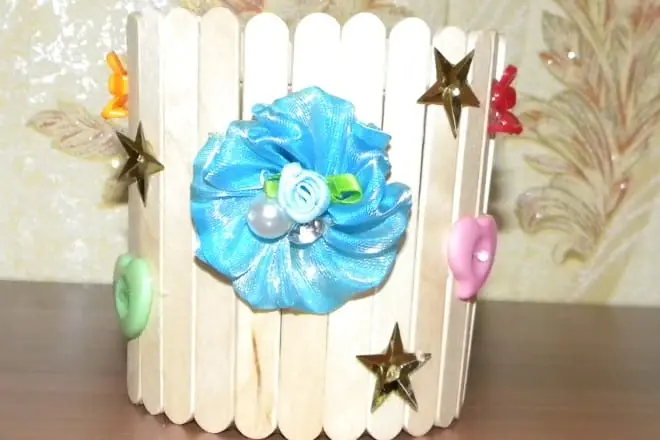
pencil holder
One of the easiest crafts from ice cream sticks is a pencil holder.

To create it you will need:
- Ice cream sticks – 20-30 pieces;
- Acrylic paints – any colors;
- Simple pencil;
- Plastic cup or tin can;
- Strong glue;
- Beads, rhinestones or any other decorative material for decoration.
The procedure for creating a pencil holder from ice cream sticks step by step:
- Paint the bottom of the base glass with acrylic paint. Also paint the ice cream sticks in different colors. Dry all parts.
- Use glue to fix the sticks on a glass or jar.
![Turning ice cream sticks into decor]()
- Decorate the pencil holder with rhinestones, beads or other material.
![Turning ice cream sticks into decor]()
A pencil box is a great craft for giving or relaxing at a resort.
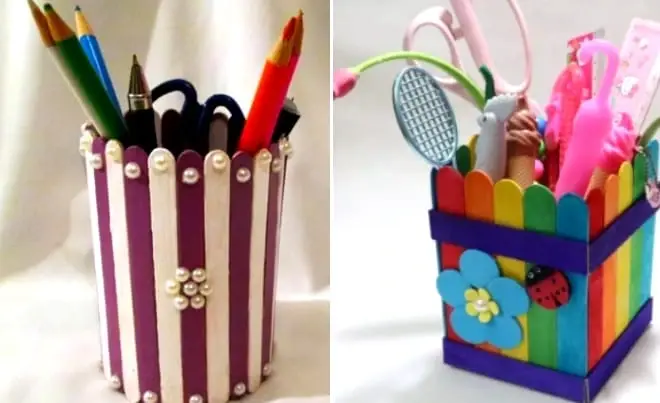
Photo frame
The frame is made in two versions – which can be hung on the wall and desktop. But the principle of connecting sticks-parts is the same for both options.
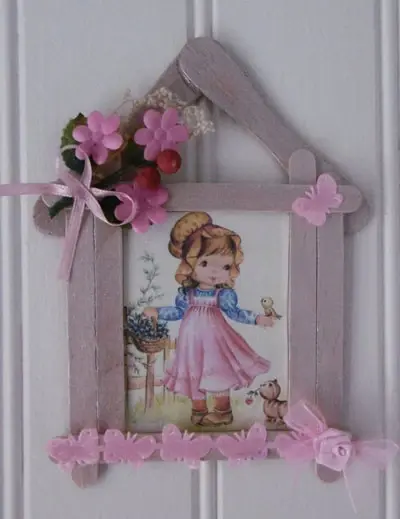
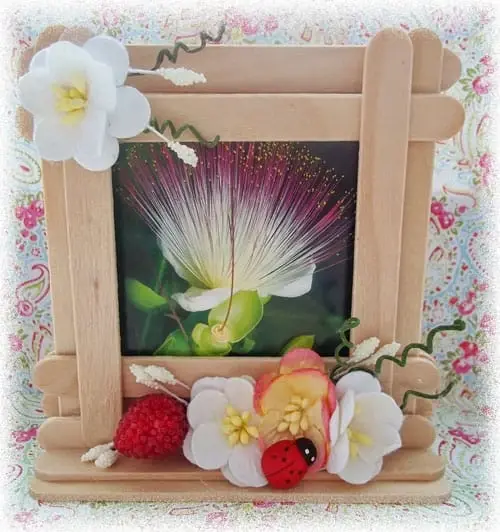
- First, glue a quadrangular frame of sticks, two sticks at the bottom and one on the sides.
- Then glue one more stick on the top and bottom side of the frame.
- Now do the same on the sides.
- If the frame is desktop, then glue the stand out of three sticks. To make it clear how to do it, look at the diagram below.
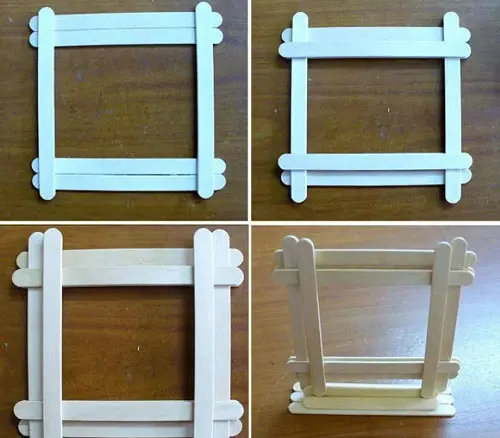
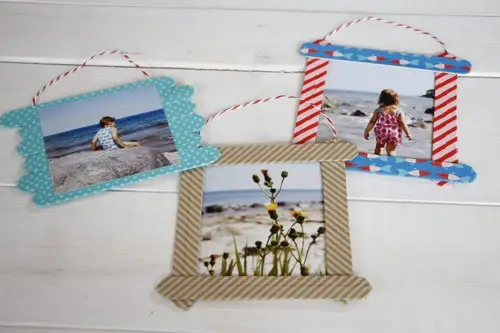
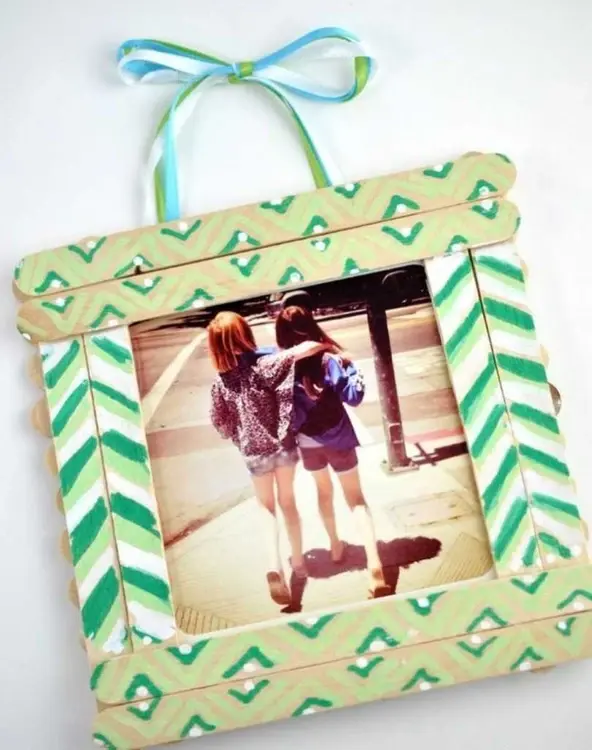
Now it remains to decorate the frame to your taste and insert a photo. There are also very simple options for photo frames, for example, these.
Drawings on ice cream sticks
Wooden chips are used to make original paintings and souvenirs. Having laid out a sufficient surface, we apply the desired pattern with gouache, watercolor, marker or ordinary household paint. Let dry, and cover with a protective agent or fixer.
A picture in the kitchen or in the nursery will give the room harmony and a magical atmosphere. You can create a colorful volumetric application on such a panel.
Conclusion
Do not count everything that can be obtained from ice cream sticks. Decorations, useful things, houses or handmade toys come out colorful and special. In addition, this is a good way to accustom your child to perseverance, develop fine motor skills and a sense of beauty. Playing with ice cream sticks helps develop your child's imagination. Parents, on the other hand, can significantly save on the purchase of educational toys.
Preparation of material for work
Ice cream sticks are considered safe raw materials for creativity. But given that small children who have a habit of putting toys in their mouths will come into contact with them, it is worth carrying out a disinfection procedure. To do this, the sticks are boiled in water for half an hour. As a result of boiling, a double effect is achieved:
- the surface is cleaned of microbes;
- sticks acquire the property of flexibility.
The property of flexibility and resistance to deformations can be given by soaking the "holders" in warm water for 12 hours. But the boiling procedure quickly endows the sticks with the necessary qualities. The working material must be thoroughly dried and the creative process can begin.
simple crafts
Simple crafts made from ice cream sticks will be great fun at home on vacation and in summer groups. They are easy to design, glue is enough to connect the sticks. The pleasant emotions that such creativity will bring will be preserved in crafts and will become a wonderful memory of the summer.
Bracelet
For the easiest and fastest way to make an ice cream stick bracelet, you will need:
- Sticks (for one bracelet 2 pieces);
- Super glue;
- Decor elements (ribbons, lace);
- Scissors;
- Pot with water, empty glass.
The bracelet is made as follows:
- At the first stage, the workpiece is soaked in water. You can soak overnight in water, you can boil for forty minutes.
- With the help of a glass, the wet stick is slowly bent until it takes the shape of a semicircle, and then placed inside the glass until completely dry.
- Both parts are tried on by hand, the appropriate diameter is adjusted and the two halves are glued together. The resulting product can be wrapped with a satin ribbon or decorated in any other way.
Bird feeders
A wonderful option to spend a family day with benefits for the environment. It might be a great idea to work together on a winter day on a bird feeder. It is done quite simply, but your baby will have the opportunity to develop a sense of empathy and care for animals in a game format.
To assemble a simple box where you can pour seeds, you can use the example with a box. Alternately cross and glue the sticks. The child can color it to their liking. We cling to the rope and solemnly hang it in the nearest park!
Camper
You will need: ice cream sticks, wooden skewers, 4 mm thick cardboard or plywood, glue gun, furniture hinges, white paint, stationery knife, ruler, scissors, pencil, compass, wallpaper, stick napkin, decoration elements – lace, flowers, satin ribbon…
- Cut out a 24 x 9.3 cm rectangle from cardboard or plywood. This will be the base of the house.
![Turning ice cream sticks into decor]()
- Cut out 2 rectangles of 15×8.5 cm from cardboard. It is worth noting that the height of these rectangles should be equal to the length of the sticks.
- Cut out a box in the center of one of the rectangles.
![Turning ice cream sticks into decor]()
- Glue the rectangles to the base to form the walls of the house, then measure the width between them.
- Cut out a rectangle equal to the width between the walls, 8.5 cm high.
![Turning ice cream sticks into decor]()
- Round the top of the rectangle as shown in the image and make the second blank in the same way.
- Glue the first blank between the walls.
- Make a door hole in the second blank, then glue.
![Turning ice cream sticks into decor]()
- Make a frame for the window by gluing the skewers crosswise.
- Glue the house with popsicle sticks.
![Turning ice cream sticks into decor]()
- Cut a rectangle out of cardboard the same size as the window.
- Cut it in half and cut off the upper corners in a semicircle to make shutters.
- Paste the shutters with sticks, glue the furniture hinges, then attach to the window.
![Turning ice cream sticks into decor]()
- Form a window sill from sticks, then glue it.
- Tape the door with sticks, glue the furniture hinge, then attach it.
- Glue the sticks to the base of the house as a fence.
![Turning ice cream sticks into decor]()
- Cut out 4 wheels from plywood or cardboard, then glue 2 wheels on opposite sides onto 2 skewers.
- Glue skewers with wheels under the base of the house.
- Make a ladder out of sticks and glue it on.
- Cover the inside of the house with wallpaper.
![Turning ice cream sticks into decor]()
- Glue on lace for curtains.
- Cut out the cardboard and glue it in place of the roof.
- Glue a doily of sticks to the roof.
![Turning ice cream sticks into decor]()
- Paint the house with white paint and wait for it to dry.
- Decorate your home to your taste with flowers, ribbon and lace.
Vases
To make them, sticks must be soaked in water. They should be flexible and easy to take the desired shape.
The work steps are as follows:
- For a future vase, take a glass container.
- Using tweezers, insert each stick into the container so that, after drying, they take on the shape of its walls.
- After the parts have become solid, take them out and assemble them again. This will be a vase made of wood.
- Paint and decorate the vase with decor or paper using the Decoupage technique.
So that the product does not crumble, it is better to mount the sticks on a similarly shaped base or vase, but outside.
Airplane
The plane will be an interesting craft for the holiday of February 23 or May 9. Such an aircraft can even fly, but for short distances. To construct it, you will need several parts from a sweet, a cocktail tube, a screw, glue and scissors.
How to work step by step:
- Glue several parts together and attach perpendicular to one. This will be the body and wings.
![Turning ice cream sticks into decor]()
- Cut off pieces of 1 cm from the tube and glue to the ends of the wings. Glue another piece of ice cream on top.
![Turning ice cream sticks into decor]()
![Turning ice cream sticks into decor]()
- Shorten one stick so that you get a small detail. Attach it to the body near the tail.
![Turning ice cream sticks into decor]()
- Cut one wooden piece in half, reproach. Fold the blanks with a cross. Using a self-tapping screw, screw to the nose of the aircraft. This will be the propeller that spins.
![Turning ice cream sticks into decor]()
- It remains only to decorate the toy.
![Turning ice cream sticks into decor]()
Puzzle
There are several options for making a puzzle, for the simplest you will need:
- Sticks (the number varies depending on the size of the pattern);
- Paints and felt-tip pens / picture or photograph – no longer than sticks;
- PVA glue;
- Scotch;
- Stationery knife;
- Colorless varnish.
Step-by-step instruction:
- The bars are laid out tightly to each other and fixed with tape.
- The desired pattern is applied to the reverse side with paints and felt-tip pens. When the drawing dries, it is varnished, and the tape on the back is removed.
- Instead of a drawn picture, you can use a photo. To do this, repeat step 1, and then grease the surface of the pictures with PVA glue. After drying, the picture is cut along the lines, the adhesive tape is removed from the back. The protruding edges of a photo can be cropped.
Christmas tree made from ice cream sticks
What a holiday without a traditional Christmas tree, under which Santa Claus will put long-awaited gifts. The image of this coniferous tree will be appropriate in the apartment, as a Christmas decoration, a gift for relatives.
Perhaps this is an interesting way to maintain a warm mood and honor the holiday. The easiest way to depict a Christmas tree is to fasten three pieces in the form of a triangle and stick a red star and colored paper on top.
Bench
The bench will be another creative craft. To create garden, doll furniture you will need:
- Cardboard;
- Design paper;
- Detail templates;
- Wooden ice cream holders;
- Glue, pencil, scissors;
- Paints.
The order of work in stages:
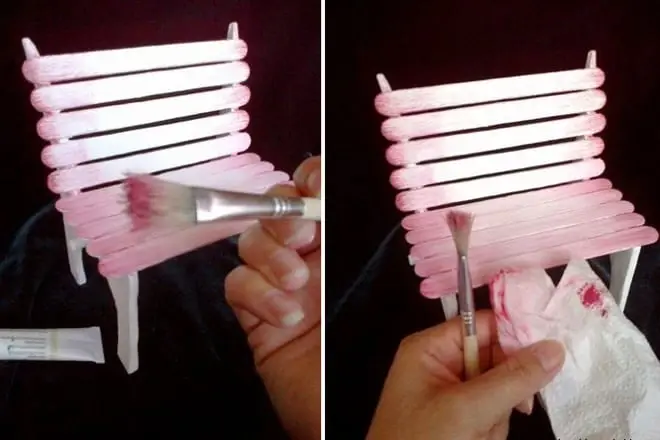
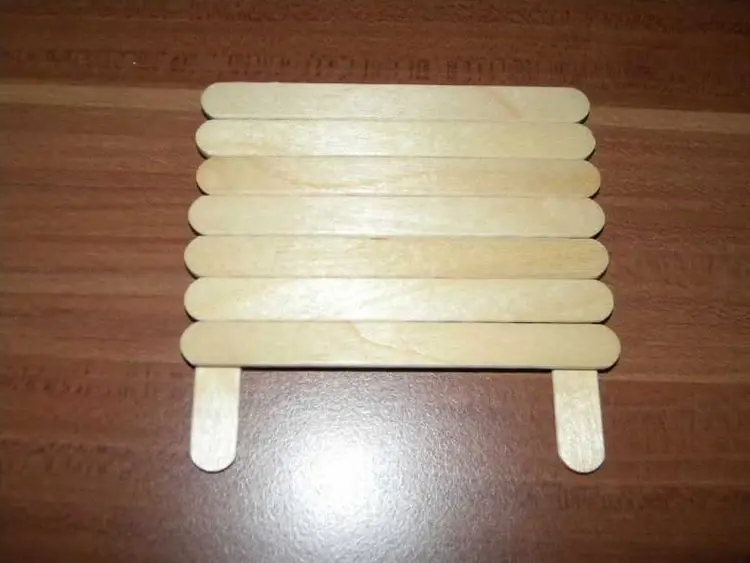
- Cut out the side pieces of the bench according to the template. Cover with paper. In the middle, make cuts in the shape of the base.
![Turning ice cream sticks into decor]()
- Connect the two sides with a wooden piece. Glue other parts of the seat on top.
![Turning ice cream sticks into decor]()
- Arrange the back in the same way.
![Turning ice cream sticks into decor]()
- It remains only to creatively decorate the bench and seat the dolls there.
![Turning ice cream sticks into decor]()
![Turning ice cream sticks into decor]()
Puppet Theatre
Imagine that in your hands are not ordinary wooden sticks, but blanks for dolls with which you can play theater and other games. Paint the sticks as you wish: perhaps they will be people, animals or characters from your favorite cartoon. With this set, you can play with friends, taking it outside.
casket
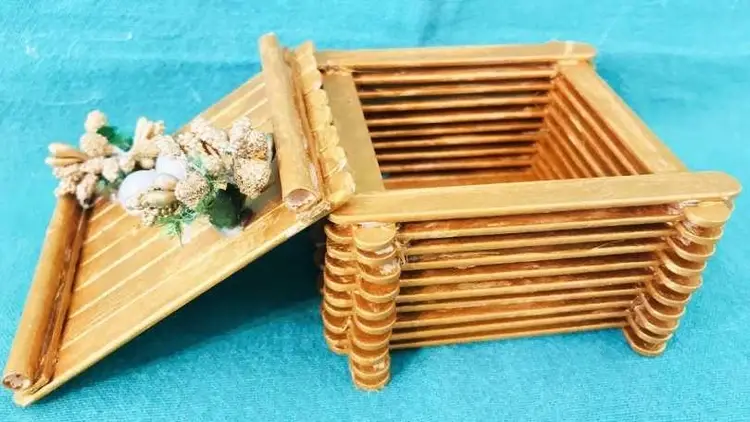
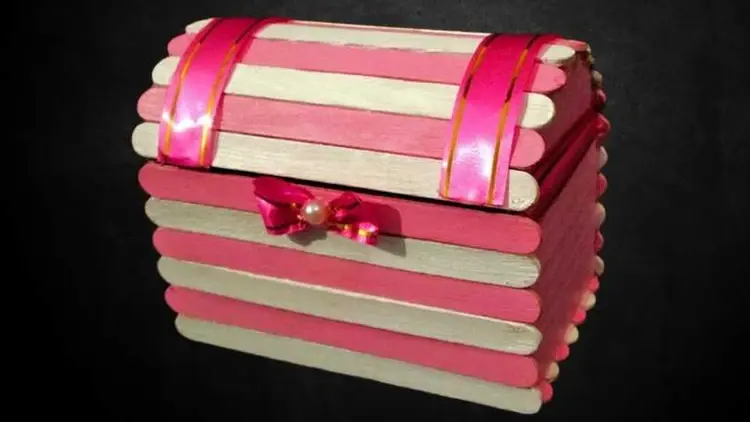
Organizers and various boxes decorated with wooden elements look incredibly beautiful. To get a container useful for storing small things, you need to glue the planks in turn and gradually bring them to the desired shape and volume.
To assemble a full-fledged box, first prepare the blanks. Decorate with wood patterns, then paint or glue on other bright accents.
The easiest way is to paste over a ready-made plastic or paper cup. An iron can will do as well. The final version can be painted or varnished.
So you give your creation a long life.
In order for a semicircular hinged lid to come out for a small chest, you need to stick pieces of wood with small gaps between them on a cardboard figure. So they can move slightly in relation to each other, and the design will become more flexible.
Boxes are well used for pencils, beads, hair clips, paper clips, threads, etc.
Fan
Another way: to make an exquisite fan, which can be used both to decorate the walls in the interior and to use it in hot weather. For a useful accessory you will need:
- Sticks (5-8 pieces)
- Sheet of paper (fabric)
- Scissors
- Glue
- thin wire
- Items for additional decor (ribbons, paints, etc.).
It is made in just a few simple steps:
- A small hole of the same diameter is made in the lower part of each, through which a wire will be passed, fastening the frame and ensuring its mobility.
- The wire is threaded and fixed, it should not be tightened too much so as not to prevent the folding of the fan. Its sharp edges are removed.
- An open fan is applied to a sheet of paper (or fabric) and circled in a semicircle (this is the very canvas of the fan).
- The part is cut out, decorated as desired and glued to the base of the fan. Then you need to carefully fold the structure with an accordion and open it again.
small house
The house will be a more complex version of the craft. This will require a lot of popsicle sticks, scissors, wood glue, a pencil and decoration materials.
The order of work in stages:
- Make 4 identical squares from sticks, glue them together. These will be the walls of the log house. Also make the slopes and the base of the roof. This will require 3 of the same squares.
- Seal all squares tightly with chopsticks.
- From other sticks make two triangles and fix them. Glue the triangles to the base. Then fix the roof slopes on them. Glue sticks into the small ends of the roof, gradually reducing each detail.
- On the walls with a knife along the ruler, cut out the windows and the door. Glue the walls together.
- Fix the roof on the walls.
The house is ready, it remains only to decorate it. Half the house can not be glued, then any toy can be placed in it.
little swing
You will need: ice cream sticks, toothpicks, chain, scissors, glue gun.
- Prepare 4 ice cream sticks and cut off their roundness.
- Glue 2 sticks together.
![Turning ice cream sticks into decor]()
- Glue 2 blanks together at an angle of 100 degrees.
- Glue the chain.
![Turning ice cream sticks into decor]()
- Assemble and glue the construction of 8 toothpicks as shown in the image.
- Glue the swing to the structure.
Tab for books
A bookmark for books is one of the most practical and simple crafts. For the simplest, you need to prepare:
- Ice cream sticks (depending on the number of bookmarks).
- Paints;
- Decorative elements (cardboard sheets, ribbons, etc.);
- Scissors and glue
The outline of the desired pattern is outlined on the cardboard, which will be glued to the bookmark. This drawing is cut out of paper twice. The ice cream stick is then dyed in the desired color. After the paint dries, a cardboard part is glued to the top of the future bookmark on both sides.
Star
Traditionally, during the winter holidays, everyone tries to decorate their homes and workplaces with stars or snowflakes. Paper garlands are gradually becoming obsolete. I want something unusual, preferably reusable. An excellent way out will be themed crafts made of wooden sticks.
The most convenient way would be if you first draw a diagram of the future crafts, and then glue all the pegs in the right way. When it comes to decorating, let your imagination run wild:
- can be painted;
- sprinkle with sparkles;
- paste over broken Christmas toys;
- wrap with snow;
- attach an electric garland;
- simply decorate with colorful accessories.
The resulting decoration can be hung on the window, or at work, taken to school or kindergarten, and even hung on the front door, instead of a banal coniferous wreath.
Stand for hot
To make a stand, you need to stock up on the following items:
- Sticks (50 pieces);
- Wooden beads (large and small diameter);
- Three identical long elastic bands;
- Drill.
Step-by-step instruction:
- With the help of a drill, three holes are made in each piece of wood: two from each edge and one in the center.
- An elastic band is threaded through the upper holes of 25 sticks, “bars" and large beads alternate.
- Similarly, you need to do with the central row, but this time smaller beads are used.
- An elastic band is threaded through the third row.
- When the semicircle is ready, you need to tie a knot and leave the tail.
- Repeat the same pattern with the second half.
- Link the parts to each other.
napkin holder
This is the simplest version of the napkin holder.
- Two sticks are cut in half. Between two whole sticks (closer to the edges), glue the halves rounded up. These will be the holders.
- Several sticks (from 6 to 8 pieces) are tightly glued together to make a bar.
- This bar is inserted and glued between the "holders" parts.
- Paint and decorate the entire structure.
There are a few other options for napkin holders.
pencil holder
One of the easiest crafts from ice cream sticks is a pencil holder.
To create it you will need:
- Ice cream sticks – 20-30 pieces;
- Acrylic paints – any colors;
- Simple pencil;
- Plastic cup or tin can;
- Strong glue;
- Beads, rhinestones or any other decorative material for decoration.
The procedure for creating a pencil holder from ice cream sticks step by step:
- Paint the bottom of the base glass with acrylic paint. Also paint the ice cream sticks in different colors. Dry all parts.
- Use glue to fix the sticks on a glass or jar.
![Turning ice cream sticks into decor]()
- Decorate the pencil holder with rhinestones, beads or other material.
![Turning ice cream sticks into decor]()
A pencil box is a great craft for giving or relaxing at a resort.
Photo frame
The frame is made in two versions – which can be hung on the wall and desktop. But the principle of connecting sticks-parts is the same for both options.
- First, glue a quadrangular frame of sticks, two sticks at the bottom and one on the sides.
- Then glue one more stick on the top and bottom side of the frame.
- Now do the same on the sides.
- If the frame is desktop, then glue the stand out of three sticks. To make it clear how to do it, look at the diagram below.
Now it remains to decorate the frame to your taste and insert a photo. There are also very simple options for photo frames, for example, these.
Drawings on ice cream sticks
Wooden chips are used to make original paintings and souvenirs. Having laid out a sufficient surface, we apply the desired pattern with gouache, watercolor, marker or ordinary household paint. Let dry, and cover with a protective agent or fixer.
A picture in the kitchen or in the nursery will give the room harmony and a magical atmosphere. You can create a colorful volumetric application on such a panel.
Conclusion
Do not count everything that can be obtained from ice cream sticks. Decorations, useful things, houses or handmade toys come out colorful and special. In addition, this is a good way to accustom your child to perseverance, develop fine motor skills and a sense of beauty. Playing with ice cream sticks helps develop your child's imagination. Parents, on the other hand, can significantly save on the purchase of educational toys.