Exercises for face and neck rejuvenation at home: rejuvenating exercises for facial muscles
Giving gymnastics to rejuvenate the face and neck a few minutes a day, it is quite possible to prolong the youthfulness of the skin and strengthen facial muscles. With the help of simple exercises, you can do without plastic surgery and other medical methods of rejuvenation. In addition, your face will retain mimic activity, “treacherous" wrinkles in the corners of the lips, on the forehead and lower eyelids will be smoothed out, and wrinkles will disappear on the neck.
Gymnastics for facial muscles: effective exercises
Mastering the complex of gymnastics for the facial muscles, during the first three to four months, give it 15-20 minutes daily. In the future, to maintain the tone of the facial muscles, it is enough to perform facial rejuvenation exercises 2-3 times a week. As in any gymnastics, consistency and constancy are important here. Long breaks in training are fraught with a loss of muscle tone – and with it all the results.
When doing exercises for the facial muscles, it is important to observe safety precautions. Perform gymnastics for the muscles of the face and neck only in front of a mirror and carefully monitor that no wrinkles or creases form on the skin. Having noticed them, check the correctness of the exercises. If necessary, while doing gymnastics for facial rejuvenation, adjust the position of the hands, the force of muscle tension, the angle of the head, etc.
Make sure that only the muscle group that is involved in the exercise works. All other parts of the face should be relaxed.
Performing facial rejuvenation exercises at home, be sure to connect your consciousness, directing your attention to the working muscle, visualizing the result. Visualization enhances the impact of exercises at times!
After performing each anti-aging facial exercise, you should feel a slight burning or tingling sensation in the muscles. This is a sign that the muscle has worked well. However, there should be no pain in either the muscles or the joints! Pain when doing exercises to tighten the muscles of the face and neck is an indicator that you are doing something wrong. If in doubt, it is better to skip the exercise, come back to it next time.
Tension should be followed by relaxation, so after each exercise, relax your face by exhaling through your mouth with a long “pfrr” sound. After completing the exercises for the muscles of the face and neck, do a "finger shower" – lightly tap the skin of the face with the pads of your fingers.
Rejuvenating gymnastics for the face and video exercises
We smooth the forehead and raise the eyebrows. This anti-wrinkle facial muscle exercise prevents the formation of horizontal wrinkles on the forehead and effectively fights those that have already appeared. In addition, it maintains the natural line of the eyebrows and returns the "slipped" eyebrows to their usual place. Thus, the overhanging upper eyelid is also tightened.
Connect the fingers on the forehead in a “lock”, gently but tightly fixing the skin. Place the little fingers exactly above the eyebrows, as if repeating their shape. Raise your eyebrows, at the same time creating a slight resistance to their movement with your little fingers. Hold your eyebrows in the highest possible position for a second. Relax your brows. Do 10 brow lifts in the rhythm of the pulse; then – a break (10 s) and again 10 brow lifts. On the last lift, fixing the eyebrows in the highest possible position, keep them tense for 10-20 seconds.
Safety engineering. When performing rejuvenating gymnastics for the face, do not press your little fingers on your eyebrows too much: the upper eyelids should not hang! And check if the jaws are clenching: if so, then relax your mouth by opening it slightly.
Without fixation with the palms, the skin on the forehead, when the eyebrows are raised, wrinkles, creating the familiar horizontal folds. By fixing the skin, we do not let it wrinkle, and at the same time we train the frontal part of the supracranial muscle, smoothing it and improving blood circulation in the upper part of the face.
Watch the video of exercises for the muscles of the face to better master the technique of gymnastics:
Effective exercises to strengthen facial muscles from wrinkles
Eliminate "crow's feet". This facial muscle strengthening exercise smoothes out crow's feet at the corners of the eyes, improves the condition of the upper and lower eyelids. Sometimes there is an improvement in vision.
Place your index fingers on your forehead above your eyebrows, lightly fixing the skin. Without raising your eyebrows, open your eyes as wide as possible. Freeze in the extreme position for 5 seconds, and then relax. Perform 5 times. At the end of the exercise, let your eyes rest: covering your closed eyes with your palms, take a few breaths, directing heat from the center of your palms into your eyes.
Safety precautions: Using a mirror and index fingers, control the position of the eyebrows, not allowing them to rise. Don't purse your lips, don't clench your jaw. The whole face is relaxed, only the circular muscle of the eye works.
As you perform this effective facial exercise, feel the movement of the orbicular muscle of the eye. Mentally imagine how it straightens out in radial directions from the center of the pupil. If performed correctly, you will feel how the muscles in the temporal region are shifting.
Gymnastics for facial muscles against wrinkles on the lower eyelids
We strengthen the lower eyelids. This facial anti-wrinkle exercise strengthens and tightens the lower part of the orbicularis oculi muscle, improves blood circulation in the lower eyelids, fights dark circles and reduces puffiness under the eyes.
Place your middle fingers on the inner and index fingers on the outer corners of your eyes. Squinting slightly, tighten the lower eyelid as much as possible, feeling the pulsation of the muscle under your fingers. Relax your eyelid. Do 10 repetitions in the rhythm of the pulse. Then – a 10-second break and again 10 repetitions.
Safety engineering. When performing gymnastics for the muscles of the face against wrinkles, the fingers should not press hard on the skin – just put them on top, fixing the corners of the eyes, but without moving the skin. Make sure that the forehead does not wrinkle, the eyebrows do not rise and the jaw does not clench.
Straining the lower eyelid, try not to use the upper eyelid at all. Help yourself mentally, imagining how the crescents of the lower eyelids slightly rise up. The skin should not move much, the task is not to squint, but to tighten the muscle.
Exercises to tighten the muscles of the face and strengthen the lateral muscles of the nose
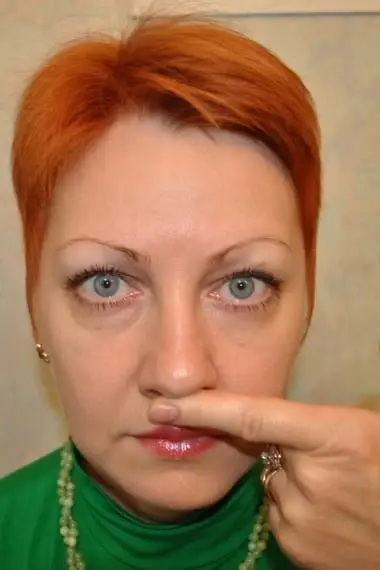 We make a "lingual nose". This facial tightening exercise strengthens the lateral muscles of the nose, which keep the nasal cartilage from “sliding” down or to the side and keep the nose from “growing” with age.
With your index finger, lightly press on the nasal septum from below so that the nose rises slightly. After contracting the lateral muscles of the nose, press the nose against the finger. Do 20 quick moves. This is enough if the shape of the nose suits you and you just want to keep it. If your nose seems too wide or too long, repeat the exercise 20 more times, taking a 10-second break before doing this.
Safety precautions: do not press too hard on the bottom of the nose with your finger, make sure that there are no transverse creases on the nose. Very often, beginners, doing this exercise, diligently wrinkle their eyebrows: do not allow this, look at yourself in the mirror, only the nose should work!
Press your nose against your finger, not your finger against your nose. If it doesn't work the first time, try to help yourself by pulling down on your upper lip.
On the video of anti-aging facial gymnastics, you can see how each exercise is performed:
Gymnastics for facial muscles from wrinkles above the upper lip
“No” to wrinkles on the upper lip! The exercise strengthens and straightens the circular muscle of the mouth, which, weakening and “shrinking” over time, allows unpleasant wrinkles to appear above the upper lip.
Performing gymnastics for facial muscles from wrinkles, tighten your lips and stretch them out with a wide “proboscis”. Put your fingers on your lips: index fingers on the top, thumbs on the bottom. Press your fingers into the area around the mouth, causing the lips to turn out slightly and separate from the teeth. Do 10 times, and then relax your lips, exhaling freely through them several times. As you exhale, lightly tap your fingers on your lips and around your mouth. After 10 seconds, repeat the exercise 10 more times. Gradually increasing the number of presses, bring them up to 20 in each approach.
Safety precautions: when pulling out the lips, do not make a "chicken tail" out of them, form a wide ringlet, making sure that new wrinkles do not form on the upper lip and around it. The fingers make short strong movements perpendicular to the plane of the teeth, without displacing the skin.
Do not weaken the tension of the lips – when pressed, they should retain the shape of a ringlet. If the lips almost closed, it means that you have loosened the muscle tension. Tighten your lips and reshape.
Exercises for facial muscles against wrinkles in the corners of the lips
Raise the corners of the lips. The exercise will get rid of the lowered corners of the lips, giving the face a dull expression, will help maintain a youthful curve of the lips and at the same time slightly strengthen the cheekbones.
Place your fingers at the edges of the lips, fixing the skin easily and without pressure. Draw an artificial smile by tightening the corners of your lips and lifting them up. Perform 10 times. After the exercise, exhale through relaxed lips, gently tapping the corners of the mouth with your fingers. After 10 seconds, smile again 10 times. Gradually increasing the number of movements, bring them to 20.
Safety precautions: do not allow the formation of wrinkles near the corners of the lips on the cheeks – the fingers should prevent this. Also, make sure that the cheekbones do not rise too high, forming wrinkles on the lower eyelids. Work only on the corners of the lips.
Feel the muscle tension under your fingers. If it is difficult to master the exercise the first time, imagine that you have a piece of lemon in your mouth and you dissolve it.
Exercises to tighten the muscles of the face and neck against the second chin
 We correct the oval of the face. Exercise eliminates the second chin, and also trains the chewing muscles, pulling up the oval of the face.
Open your mouth a little, as if you are pulling the sound "Y-y-y", and push the lower jaw forward a little. Rest your chin on a clenched fist. Straining the chewing muscles, as well as the muscles of the chin and neck, press the chin down, providing counter resistance with your fist. Perform 10 repetitions, each time freezing for a second in a tense position, then a break of 10 seconds and again 10 repetitions.
Safety precautions: Do not twist the lower lip to avoid creases going from the corners of the lips to the chin.
After a strong tension of the chewing muscles, you need to relax them. To do this, freely lower the lower jaw, opening the mouth. With your knuckles, stroke the masticatory muscles several times in the direction from the temples to the chin. Then take a few long breaths through relaxed lips.
Exercises for neck rejuvenation at home
Keeping a smooth neck. Maintaining the tone of the subcutaneous muscle of the neck – platysma – helps to improve the blood supply to the deep layers of the skin, prevent the appearance of deep wrinkles on the neck and reduce those wrinkles that have already appeared.
When performing exercises for neck rejuvenation, place your palms on your neck, gently but firmly fixing the skin. Pull the chin forward and up, feeling the tension in the subcutaneous muscle of the neck and deeper cervical muscles (2-3 seconds), then relax (also 2-3 seconds). Do first 10-15 times. Then, when you get comfortable, you can do two sets of 10-15 reps each.
Safety precautions: make sure that the skin on the neck does not move (check in the mirror for creases). Raise the chin low and do not pull it too hard so that the skin of the neck does not stretch excessively: the movement is tense, but small.
Do not press your hands on the front of your neck. If you have a serious thyroid disease, check with your doctor if you can do this exercise!